Pirate 4x4 banner

Cheapass Wireless Winch Remotes That Work AWESOME!!!

145K views 57 replies 32 participants last post by  csmoffshore  
#1 · (Edited)

Attachments

#2 · (Edited)
How to wire it:

Get access to the wiring for your winch, depending on the winch, might be external like this one, or you may have to work a very small amount at it like on a Warn 9500i.

1. 7 pin winch remotes tie the relay ground inside the wired remote. I personally can see absolutely no reason for this, so I just tie the relay grounds to a good ground on the winch. In the case of this 8274, that means figuring out which is the ground (the orange wire here) and running a jumper between there and the case ground located at the bottom of the motor (where the large ground comes from the battery). Attention warnindustries, why do you guys wire it this way?

2. You'll need to wire the wireless remote control box using three wires, a B+ (12 volt positive), a "winch in" wire, and a "winch out" wire. In the case of the 8274, the "winch in" is green, and the "winch out" is white. I used about 10 feet of 6 conductor 20 gauge stranded wire that I already had, so that leaves me options for using the remote for other stuff on the Jeep later. After you connect it to the winch relay, you're done in here...button it up and tie it down and route the wire in some loom back to the inside of the vehicle where the wireless remote control box will be mounted. It's not waterproof, so you'll want it high and dry inside the rig somewhere.
 

Attachments

#3 · (Edited)
At the remote box

Next you'll need to open up the remote box and remove the jumper pins for the first two remote relays. This makes them momentary. You can see the first two pins pulled in the upper left of the picture.
 

Attachments

#4 · (Edited)
Wiring the wireless remote box

1. Connect the positive you brought back from the winch to the one each of the gray and brown leads, this will be the "line" side.

2. Connect the "winch in" (green in this case) wire to the remaining gray lead from the wireless remote control box

3. Connect the "winch out" (white in this case) wire to the remaining brown lead from the wireless remote control box

4. Connect the black wire from the wireless remote control box to a good ground

5. Connect the red fused wire from the wireless remote control box to a switched positive. You don't want it connected all the time because it will draw a bit in standby mode and may draw down your battery over time. I have a master switch in my rig that turns on a large relay that runs all of my accessories except the winch, which is where I connected it.
 

Attachments

#5 · (Edited)
The remote

Now that you're done wiring, mount the box (you can use the provided velcro mount, that's what I did) and tie all your wires down properly.

This is the remote. It has four positions, but I've only used two in this case. When you want to use it, turn it on with the slide switch on the front of the remote. At this point pushing the 1 button brings the winch in and pushing the 2 button brings it out. Your wired remote should still work fine too.

The remote uses a single 23A battery, I bought a spare for my rig and keep it with the spares for my welding helmet, flashlight, etc. in case I leave it on by accident.
 

Attachments

#6 ·
Other ideas

I showed this as the most simple winch remote wiring (obviously not in my rig, so it could be easily seen for the pictures).

In the actual rig I used the 3rd position to run my LED driving lights so I can turn them on remotely when I am out winching...turn them on when I am working, turn them off when I don't want to be blinded.

In a buddy's rig who has the Warn Endurance 12.0 with the auxilary cooling fan, I used the 4th switch so he can remotely turn the cooling fan on and off. This was done pretty easily using a Bosch 5 pin 30 amp relay inside the remote box. In the case of this winch, the ground on the fan is switched, so I used the remote to drive the relay that completes the ground and runs the fan. It has a 15 amp fuse on it from the factory, so I didn't want to take a chance on overloading the 15 amp capacity of the remote, so I added the 30 amp relay.

Note: Every time you cycle the power to the wireless remote control box, all the relays re-set to open.
 
#8 · (Edited)
Holy shit, I shoulda searched back 6 freakin' years. Oh well.

So riddle me this: Why do winch manufacturers tie the ground thru a double pole switch in the wired remote?

Buehler?
 
#10 ·
This is my understanding about the additional wiring vs. the old 3 pin controllers: To operate the winch two opposite corner solenoids in the pack are energized at the same time, right? With the 3 pin controller the controller supplies power to one solenoid and then the second solenoid is supplied via a jumper from the first. If one solenoid has a meltdown it could keep supplying power to the other solenoid which would leave you with no way to stop the winch. With the 5 pin controller each solenoid is isolated so a meltdown in one will still allow you to kill the corresponding solenoid when you let go of the switch.

I don't know what the extra 2 pins are on the 7 pin.
 
#11 · (Edited)
Interesting, good explanation...

I don't know what the extra 2 pins are on the 7 pin.
On a lot of winches they're empty, on Warn "Endurance" series with the cooling fan, there's an extra switch on the handle to manually turn the fan on and the empty pins are used to overide the thermal fan switch and run it constantly.
 
#12 · (Edited)
Lets add another cheep date wireless remote to this thread:
Harbor freight Badlands Wireless controller

I just picked one up for $20 using coupons, and will post the tech details after i install it on my Warn HS9500. My plan is to stealth wire it in with an on/off arm switch, so I can use either the wired remote or the Wireless one. Will be Installed very similar to resqme's, IE, mount the receiver out of harms way. It does not look waterproof enough to mount in the elements.

Full write up with pics, pinouts and wire functions to come.

Image
 
#16 ·
Lets add another cheep date wireless remote to this thread:
Harbor freight Badlands Wireless controller

I just picked one up for $20 using coupons, and will post the tech details after i install it on my Warn HS9500. My plan is to stealth wire it in with an on/off arm switch, so I can use either the wired remote or the Wireless one. Will be Installed very similar to resqme's, IE, mount the receiver out of harms way. It does not look waterproof enough to mount in the elements.

Full write up with pics, pinouts and wire functions to come.
Let us know what the real world range of this one is. I have 200' of rope on my winch, so they controllers that advertise 50' or 65' aren't going to cut it for me. I like the range of the OP's controller, but the actual remote seems too small, hard to use with gloves and easy to lose.
 
#14 ·
For you guys running wireless remotes, do you have an "off" switch or something for when you're not using it? I'd be worried that somebody else's remote (or keyless entry, or garage door opener, or pacemaker, or something) might cause my winch to suddenly start reeling in or out when I don't want it to.

Do the wireless remotes have some way to prevent this?
 
#15 ·
Mine are all wired through a switch on the dash that turn on the receiver. All my rigs have a master switch that turns on "everything" to avoid battery drain when they're parked, that's what I wire it to. Nice to get in and turn on one switch for my ham, stereo, etc. too.
 
#19 · (Edited)
Harbor Frieght Wireless Remote to Warn Winch FAQ

What is the "real range" of the HF Wireless Remote?
  • Over 200' easy. I tested this by connecting a test light, and walking well over 200' away, and activating the controller, and seeing the light go on and off reliably.

What is the HF Wireless pin out? There are only 4 wires. If you cut the Connector off they are:
  • Black = Ground
  • Yellow/Green = +12VDC Supply
  • Brown = Winch Out +12vdc Output
  • Blue = Winch In +12vdc Output

What is the Warn pin out? There are 5 wires, they are:

  • White = +12VDC Supply
  • Red = Ground (Jumoer to Brown for use with HF Wireless)
  • Brown = Floating Ground (connected to ground when switch is activated)
  • Black = Winch Out +12vdc Input
  • Green = Winch In +12vdc Input
How do I connect the HF Wireless to a Warn 5 pin connector?
(I base this on mounting the controller away from the winch, in a safe spot out of harms way from the elements. For example, under the hood)

  • Install a SPST Arm Switch, with a fuse in line from an unswitched 12vdc source, and connect it to the Yellow/Green wire on the HF Wireless controller
  • Connect the Black wire on the HF Wires controller to a good ground.
  • On the Warn Solenoid pack, tie the grounds together by jumping the Red wire to the Brown Wire. The red wires is the Connected Ground, the Brown Wire is the floating ground. Warn's switch is a DPDT, it switches both the Hot and the ground, to the solenoids at the same time. (Mentioned above already)
  • Connect the Brown Wire from the HF Wireless to the Black Wire on the Warn (Winch Out)
  • Connect the Blue Wire from the HF Wireless to the Green Wire on the Warn (Winch In)
Note: If all you want to do is plug the HF remote directly in, you will need to jumper the grounds. You may also need to enlarge the inner diameter of the HF plug slightly if it does not make a good connection, it is slight smaller than the Warn plug.


Warn Schematics:

5 Pin Remote

Image


Image


Large Frame 5-Wire
Image


Circuit Diagram
Image
 
#22 · (Edited)
I just wrote up how to do it. You have to jump the Solenoid to ground, so when the HF Wireless sends the 12vdc to the Solenoid it will activate. Otherwise no beuno.

Keep in mind, you have to have power and Ground going to the HF Controller, it runs of of 12vdc, and it switches 12vdc to the Warn Solenoid pack to turn on the solenoids, which switch the big dawg power directly from the battery, and make your winch go in or out. This is why Resqme, the OP, and myself are hard wiring the devices in, and installing a switch to arm it for use. (Resqme has already done this in both his wife's rig, and his with the Pilot product. Both wire in essentially the same)

If your not comfortable with electrical, find a buddy who is to help you.

WARNING!!! The Current available at the winch can KILL or seriously injure you, so don't be stupid and try something like this unless you know WTF you are doing!!! Seek hlep from someone knowledgeable with electrical, in person, and not via the keyboard. Ya either get what is posted in this thread or you don't, got it?
 
#23 ·
Warn Works 3700 utility winch HF Wireless

Warn Works 3700 is a 3-wire, it breaks at as follows:
Warn side:

  • 12vdc is White Wire (Feeds 12vdc to remote switch common, from red wire battery connection inside of Solenoid pack)
  • Ground is Brown Wire (Inside Solenoid pack only)
  • Winch in is Green Wire (Sends 12vdc to "In" side of Solenoid pack)
  • Winch out is Black Wire (Sends12vdc to "out" side of Solenoid pack)

HF Wires: (HF = Harbor Freight Badlands Wireless Controller)

  • 12vdc is Yellow-Green Wire (Powers up controller cirictry, and used as supply source to operate the in and out Solenoids)
  • Ground is Black Wire (Completes power circut in wireless controller so it's micro relays work)
  • Winch in is Blue Wire (Sends 12vdc to "In" side of Solenoid pack)
  • Winch out is Brown Wire (Sends12vdc to "out" side of Solenoid pack)


How I would test first:
  • Pull some cable out
  • On the solenoid pack, test the in, by jumping the green wire terminal to the the brown wire, either end. Should wind the wire in.
  • On the solenoid pack, test the in, by jumping the Black wire terminal to the the brown wire, either end. Should Spool the wire out.


This is how I would wire it is it matches the functions above, at the solenoids:

  1. Cut the HF Plug off. You will need to splice the HF wires to attach the the same terminals in parallel with the Warn wired remote at the solenoid. I like to add some shrink tube over the crimps to add some strain relief to the connection. I would probably cut off the warn red female spades, and get 2 female blue insulted female spades. Then twist the wires from the wireless with the wired, insert into the blue female spade, crimp, and re-connect to the solenoid male spade. You could splice them in, but it is more work, and not as clean IMO.
  2. Mount the wireless control box on the winch somehow, close enough for the wires from the wireless to reach the terminals inside the cover for the solenoid pack. I would mount it on the outside of the solenoid pack cover.
  3. Splice HF 12vdc Yellow-Green Wire through a switch to Warn White Wire. This supplies 12vdc to the HF Wireless controller, Switch is to disable it when not in use. Very important for safety reasons to have the switch.
  4. HF Ground Black Wire to the Warn Brown Wire. This supplies Ground to the HF Wireless Controller.
  5. HF Winch in Blue Wire to Warn Green Wire
  6. HF Winch out Brown Wire to Warn Black Wire
Image


Image


Should be good to go, turn on the wireless controller with the switch, and test.
Report any issues (Should be none))
 
#24 ·
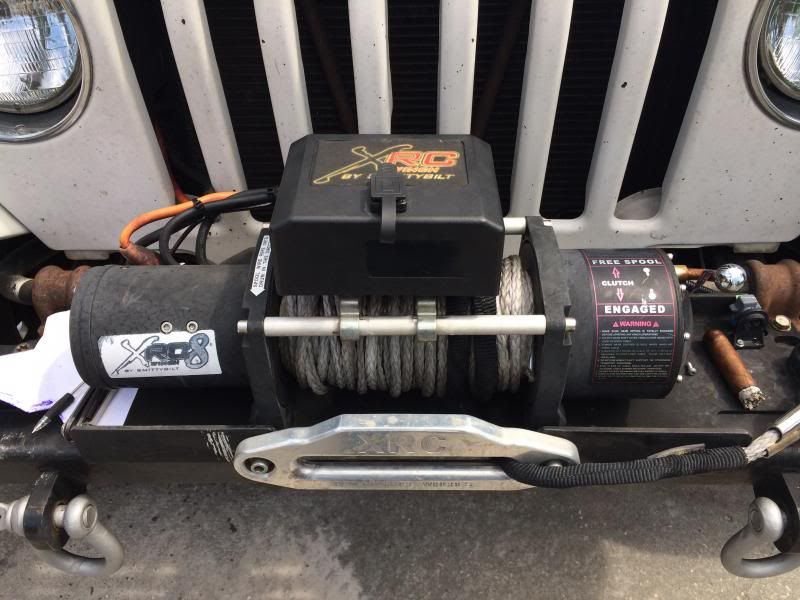
Havn't found a write up on this specific conversion, so my son and I broke ground and did it today.


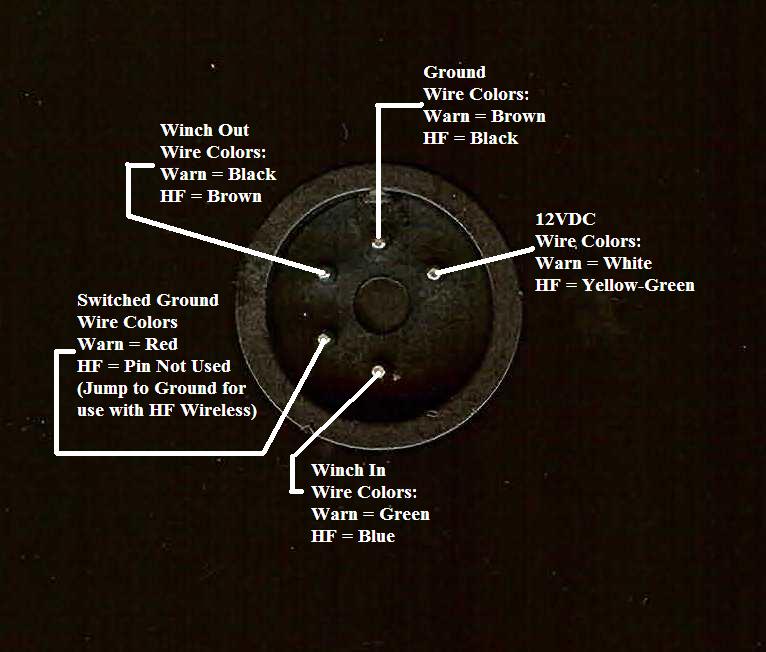
If you've done a Warn 5 Pin conversion before then this one is simpler. you just have to keep track of the wire colors as they switch inside the solenoid housing.


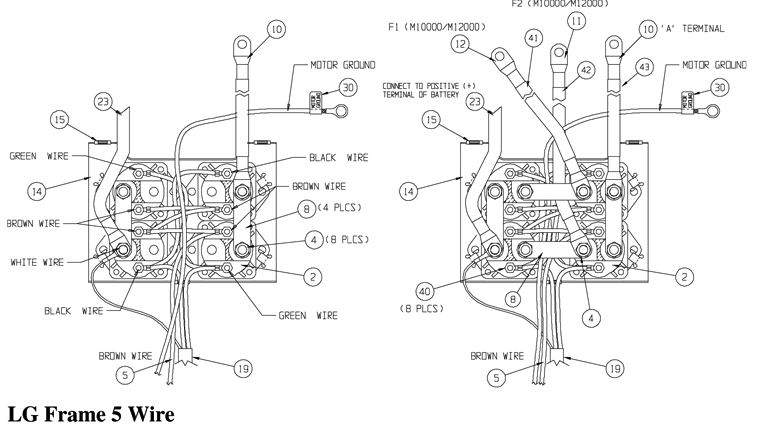
At the solenoid the wires are:
Red-Positive
Green-Out
Blue-In

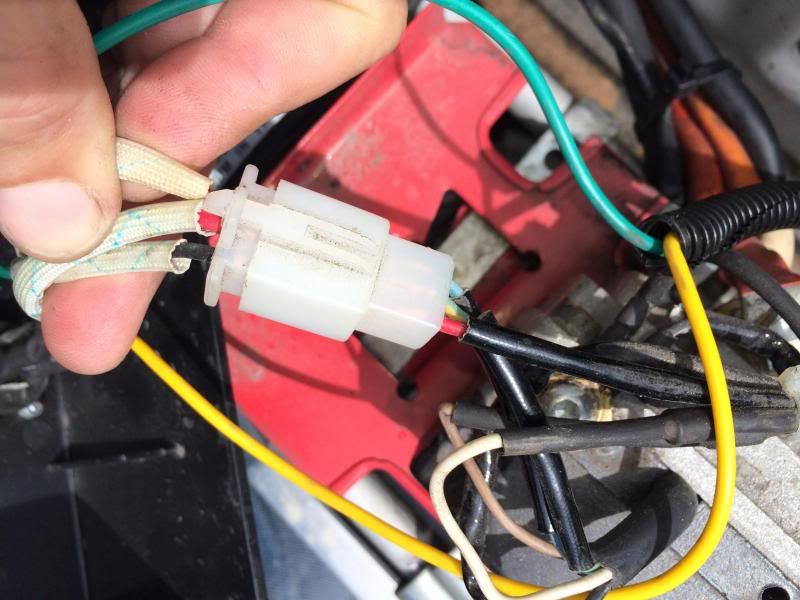
Then they go to a white Plug to the Solenoid lid, and they switch:
Black-Positive
Red-Out
Red-In

Yes, thats not a typo! The RED Positive wire changes to BLACK, and both IN and OUT wires change to RED.

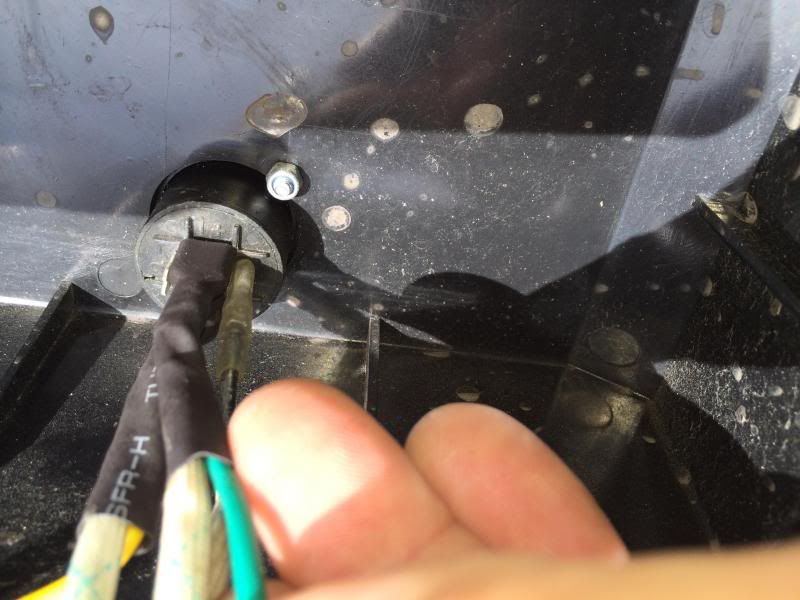
Where they connect to the lid plug with the small female spade plugs is where you want to make your connections.


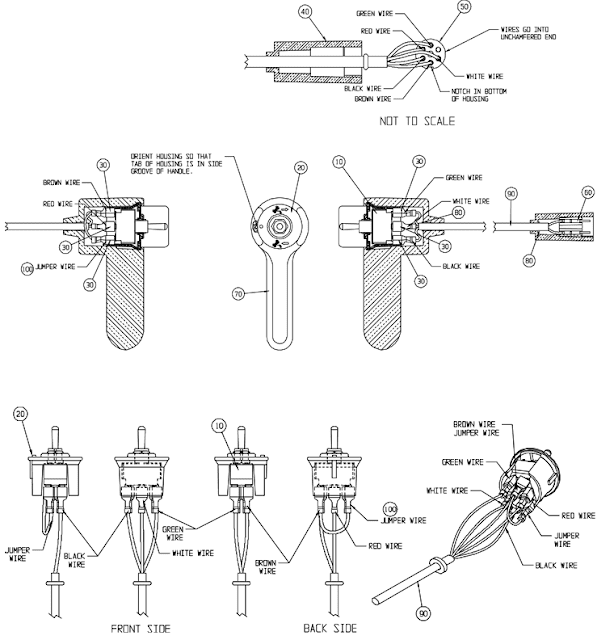
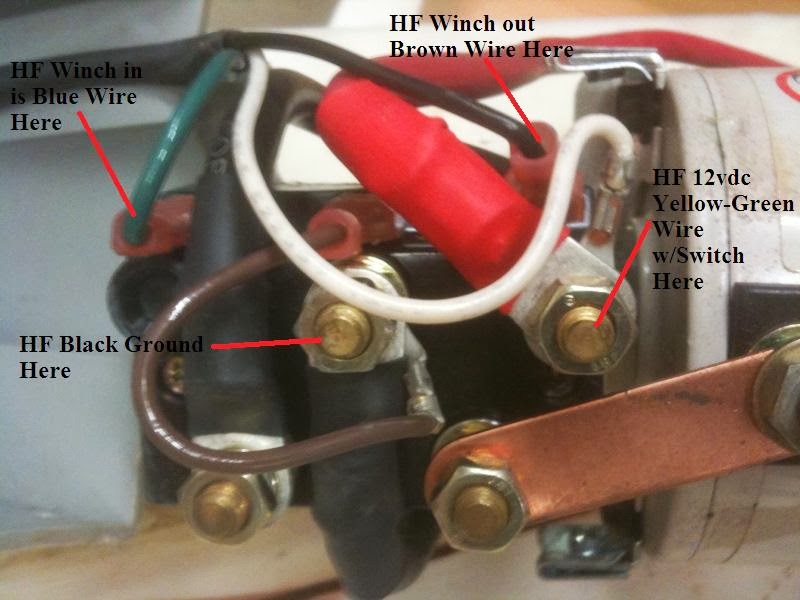
Follow the center red wire to the end and unplug it. This is your OUT WIRE, and cut the end off and attach a Brown wire to it with a small female spade plug and put it back on. Then run that brown wire back to the HF Badlands box and connect it to the brown wire lead.

Then the second red wire is your In Wire and splice in a blue wire the same way and run it to the Blue wire lead on the HF Badlands remote box.
(Disreguard the wire colors of my wires in the photos as I didn't have either Brown or blue wire. So I used green and yellow. LOL)


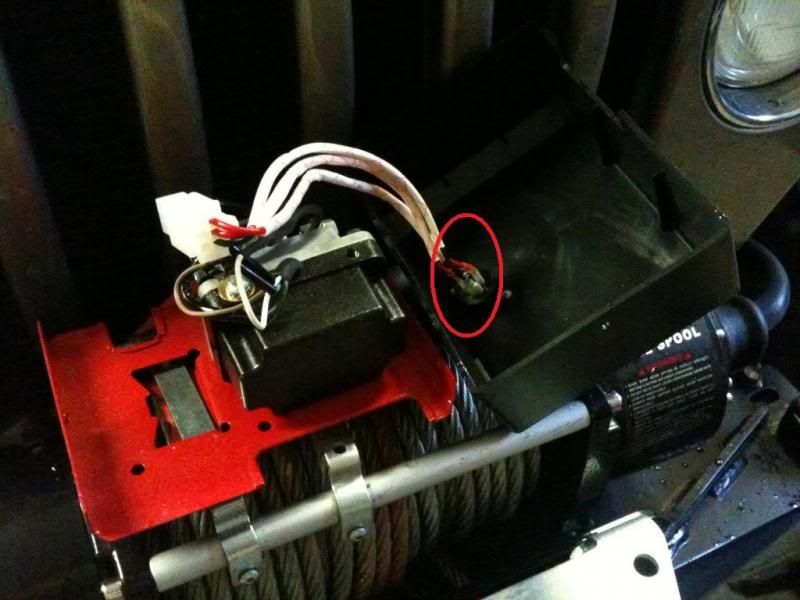
The other 2 wires on the HF Badlands remote box are:
Black-Ground
Green with stripe-Positive to battery.

Theres a Short Green wire that comes out of the box all by itself. This is the antenna wire. Just let it hang free, or zip tie it to something if you want. Do not ground, or connect it to anything.

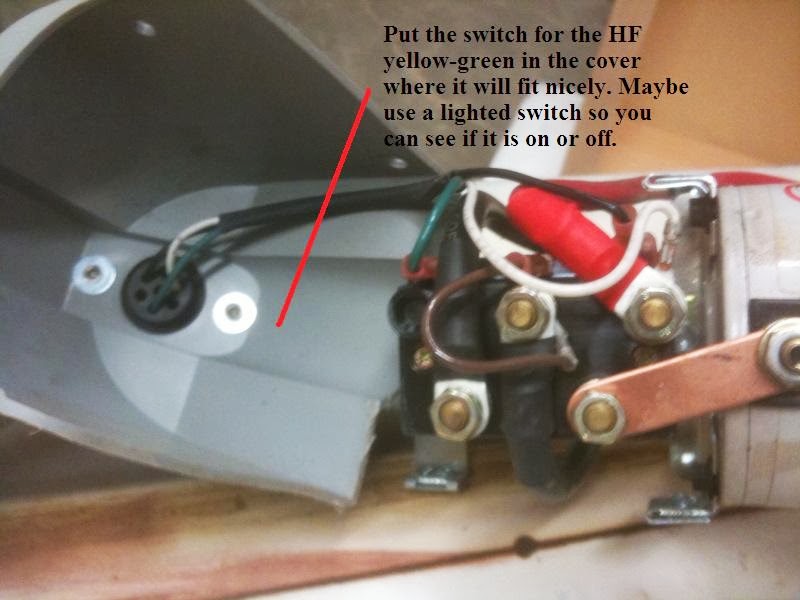
It is always recommended to put a switch inside the cab to the positive wire to prevent any possible unwanted radio interference from other winch remotes that may be on the trail with you. We tested mine and my sons and they are in fact on different channels. But just how many channels are out there, we do not know.
 
#26 ·
Just to keep adding to this thread as there has been some great additions to it already.

This is the one I purchased several years ago.
Roadless Gear. Wireless Winch Control

Easy to wire in, has worked flawlessly and one feature I like over many others is that it does have a on/off switch right on the remote. No accidental engagement even when in my pocket or glove box. plus Figmo's customer service is fantastic should you need assistance.

I have used the remote more often than I could ever had imagined I would have. so nice for when your out of the vehicle winching yourself or others and you can move around freely without that stupid wired remote getting tangled every where.
 
#29 ·
I got a bunch of the HF remotes and they've worked well. Put one on the Superwinch on my trailer. Only downside is that if you lose the remote you have to replace the brain. There doesn't seem to be any way to re-sync them.
 
#30 ·
This is a little off topic but relevant so.....

I've encountered a similar but different problem. I HAVE the Badlands 12k winch and I'm mounting it hidden. I do not want a wireless remote, but rather need a whip for the solenoid controller that I can mount flush to the top of my new bumper, that way I can plug in my antique wired remote right to the top of the bumper.

I've had a hard time finding the parts I wanted to make one..HF said they sell an entire replacement remote for $15 that I could use for the male end. And I'm going to call the parts line on Tuesday when they are in to see if I could just get the female plug from the solenoid box..

But I ran across this 2ft Warn socket extension on amazon...slightly pricier but would be plug and play..

Image


Amazon.com: WARN 14867 Socket Extension, 2 ft: Automotive

Even though the Warn 5-pin is wired differently than the Badlands 5-pin, that won't matter just using an extension from Warn. But is the diameter the same? It sounds like it is.. Anyone know if this extension will work with the round 5-pin version?

Very little info on this part from Warn..The Q&A at the bottom says,

"Q: Does this fit the new D shaped control socket?

A: Yes it does. The D shaped control socket from your wired remote or from the Warn wireless transceiver fits over this round connector. I use it with both."
 
#31 ·
Why not just extend the leads on the existing plug to mount it remotely? You're just giving yourself another plug to eventually suffer corrosion without easy access or complete sealing.
 
#32 · (Edited)
Because, it's the cleanest way of making the extension to the bumper and keeping the unit as weathertight as possible. I disagree with your presumption. Take that female end of the socket out of the side of the solenoid box while keeping 4-5 extension wires coming thru there and try to make it weathertight. You're asking for a dead in the water winch.

This plug and some silicone is going to be your best bet.

Here's the wiring drawing of the plug from Warn for purposes of determining pin style. The OD of the plug is 0.665". Looks like the only difference is the Badlands plug doesn't have the notch. I'll just cut off the notch on the male plug and the female side where notch is will be covered by the cap showing on the outside of the bumper.

Image
 
#33 · (Edited)
Weather &/or submersion won't hurt soldered splices, but it WILL affect mated pins. The best way to keep the brain box protected is to mount it in the cab, and wire its power to the ignition switch so it's only on with the key. That automatically prevents anyone else's remote from triggering your winch when you're not around, and you don't have to think about it before using your own remote. Wire the box's outputs to your dash winch switch (you have one already, right?), and if the box ever fries, it'll be easy to jerk its wires loose.

Too bad the latest Amazon reviews say that the momentary (winch) feature has been deleted from the Pilot system.