Pirate 4x4 banner

1947 Willys CJ-2a retro-wheeler (build)

367K views 467 replies 73 participants last post by  WILLYN  
#1 · (Edited)
------Retro Wheeler rebuild/overhaul------

What follows is the build and evolving story of my latest project. This starts out with a story but evolves into a build...

In the begining my dad had a 1947 Willys CJ-2a. He used to take me out for rides in it, though the only one I can remember is going out to shoot my bb gun. I remember getting dust in my eyes and feeling like I was going to fall out... but I still remember liking the jeep. My mom tells stories of them wedging my car seat in-between them and I'd just be happy as can be for all day jeeping adventures out in the desert and high sierras.

In 1980, we moved to Alaska and the Jeep went into storage in my grandma's garage in southern California. From that point on, I only saw the jeep on Christmas. Each year I'd go out there and play in it, dreaming of someday getting to rebuild it with my dad and of course drive it!!

Well, the years went by... in 1993 we still lived in Alaska, but my grandmother was forced to move out of her home. The jeep was sold to a friend of my dad's for a $1200 I think... for a clean, stock Jeep without a bit of rust. It was so stock it was still 6 volt even. My dad isn't the type to modify much of anything! I'm typically the opposite.

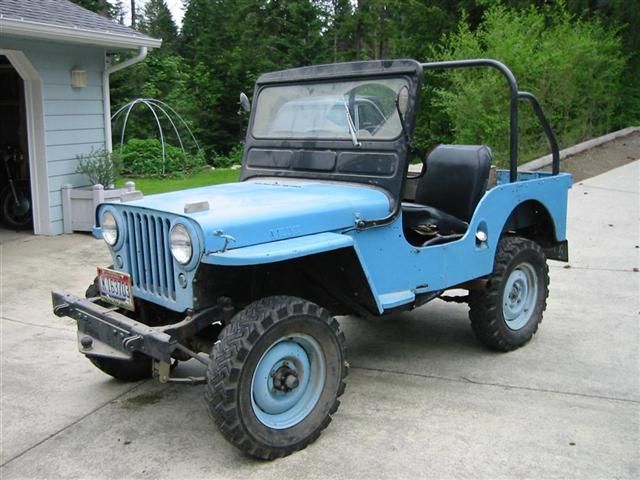
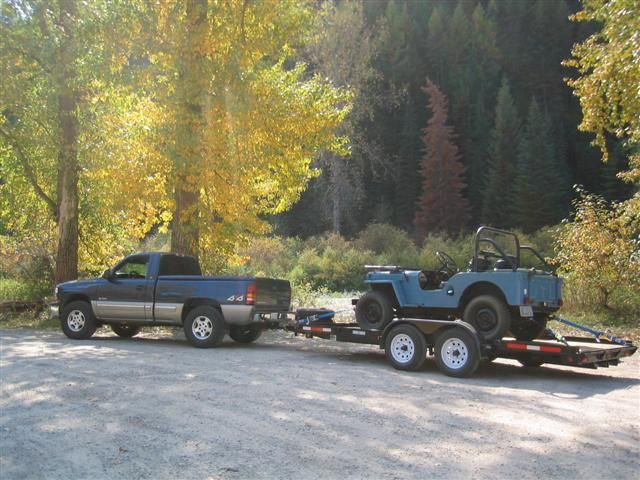
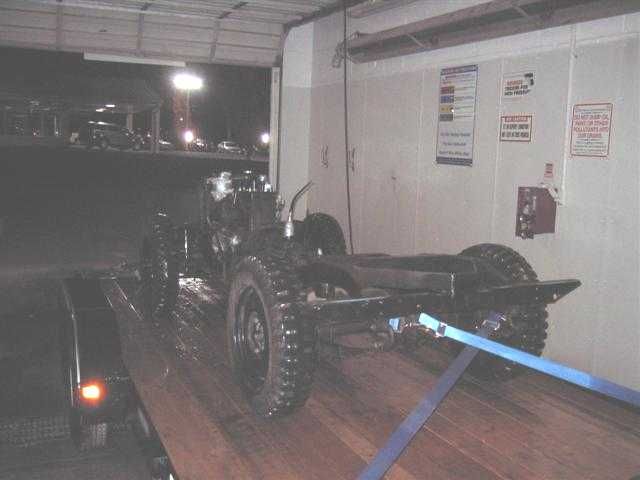
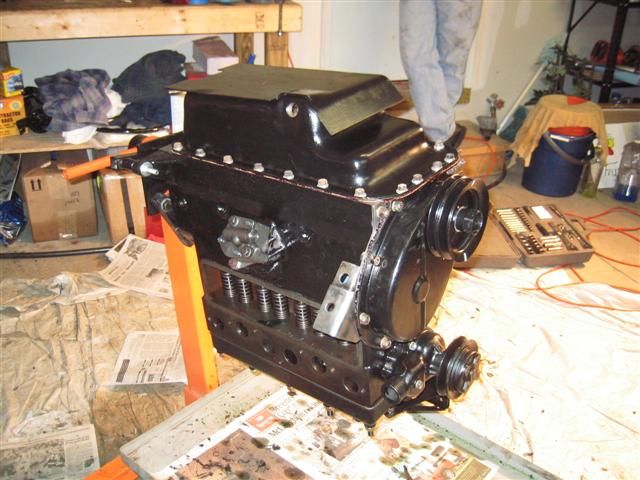
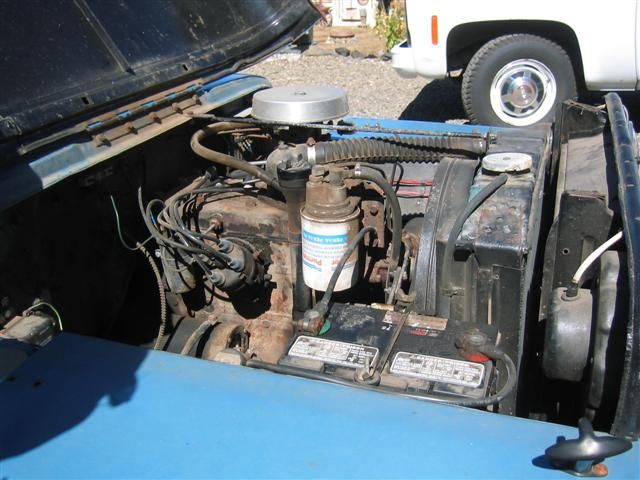
So his friend owned it for a number of years. He had a 225 v6 swapped into it, along with some 2.5" rancho's and a set of larger drums. And it continued to sit. In 2002 I finally got around to catching up to the old Jeep. By that time it had been moved up to northern Idaho, which was somewhat convenient since I was in NW Washington at the time. He was willing to sell it, but for $3k. At the time I had no place to store it, no place to work on it, and I figured at that price it wasn't going anywhere very quickly. Here's a photo from then:

Image
 
#2 · (Edited)
A few more years went by and finally this summer I realized that I really did want to get a hold of that jeep and go through it while I still could. I had always been a fan of the flatty style, but honestly, I had always intended to buy one mostly for the body, not to restore, but to turn into something with some flatty character and a modern drivetrain. (and I still want to do that one of these days). I guess the last few years of wheeling I've just started to get a little bored with it. My regular wheeling rig, though not very built, would honestly go anyplace I wanted to go and it would do it so easily that the only real challenge was keeping from tipping over. I guess I've been thinking that I need to start over. And maybe even start over wheeling something stock again. So what the heck, why not try with my dad's old jeep?! Sure, what the heck.

So last summer I happen to be in Idaho, outside Hayden Lake (where my dad's jeep was at) and I called up the owner to see if it was still for sale. Bad news. He says a tree fell on it about a year ago. It missed most of the body, but folded the front frame rails over. He basically assumed it was a loss, put it in the paper and sold it off as a parts rig. He didn't bother to get the buyers name either. Dang. Dang. Double dang.

By this time I had already convinced myself that I was going to get a flatty... so the search began.

All I can say is.... flattys are turning into gold. I looked at ebay jeeps, I looked at a craigslist jeeps, I drove jeeps, I kicked tires, lifted hoods, looked at photos and talked to old deaf guys that couldn't remember anything about the jeep remains that they wanted far too much money for. It just got worse and worse.

You also get a real appreciation for what people term as rusty.... Check out this winner I found for $1500 (it's much worse than it looks. No motor, even the replacement sheet metal that was riveted and duct taped in to the floor is rusted out).

Image


Well, one day I happen to be out in Port Angeles Washington, waiting for the ferry up to canada. I had a two hour wait, so I went for a walk around town. I happened into a bookshop and wondered by the magazine isle. The one magazine, vintage truck I think it was, caught my eye. It had a cover story on an old overdrive of one sort or another. I read through the magazine... but no OD article. Hmm. So then I kept flipping and came to the classified section. Usually I look at these for humor, you know this is where people list there unmentionables for 20k or whatever. Anyway, yup, there's another willys cj-2a. Hmm, 2800 eh? Hmm... 360 (Washington) prefix. Hmm. So I jot the number down and figure I'll call it some time.

Back at the ferry I call the guy up and get this... He lives in Port Angeles.

Interesting.

So we talk, he's got an old willys, it runs, it drives, it's even registered. Hmm. Tell me more

So we talk a little more and I tell him I'll come see it that weekend after I get back from canada.

About 20 minutes later I realized that I'd probably be thinking about this jeep during the entire trip, and I'd be kicking myself if he sold it in the meantime. So I called him back up and said I wanted to see it. No problem.

Anyway, overly long story, made slightly shorter, I bought it, and here it is!

Image


Image
 
#3 · (Edited)
Now there’s one more catch to this story. I bought this Jeep about three weeks before I was due to start a 1 year work assignment in central Pennsylvania (State College/PSU). Anyway here’s where things start picking up. I got the Jeep, bought a trailer a few days later, packed up my stuff in my pickup, arranged with a buddy of mine to have a garage to work in, picked up a bunch of parts from Herm the OD guy, picked up a used Warn OD from a friend, and started my drive out east!!

Image


(My little contribution to "tow rigs" 2002 Chevy 4.8/5spd/4.10's w/ 285/75R16 Coopers. I only get 12.5mpg towing, but it gets the job done.)
 
#4 · (Edited)
So that was a long prologue. Time for the build!

Plans: Stock rebuild with tasteful or stealth mods. My intent is to keep the flatty feel, but improve what I can along the way without sliding down that slipperly slope....

Step 1 Teardown. EVERYTHING gets bagged and tagged. BTW, a very big thanks to my friend John for hosting both my pictures and this build. :beer: His garage will never be the same. :eek:

Remove front clip/dump fluids all over floor

Image


Strip interior/dump gas all over floor and attempt to poison friend's wife's plants

Image


Chain up body to hoist

Image


Yank it

Image


Bag and Tag for later

Image
 
#6 · (Edited)
Separate motor and trans
Image


Basic roller chassis
Image


Unhook front springs
Image


Front shackles. Something I learned on these is that for certain year jeeps (mine included) the end of two of the shackles are LEFT HAND THREAD. I think it's front left spring end and back right spring end, but can't remember exactly.
Image


Bare Frame
Image
 
#7 · (Edited)
L-head Rebuild

In retrospect, I'm not entirely sure if I would choose to rebuild the L134 if I had it to do over again. On the one hand, if there is one thing that defines the original flatfender, it's an L-134. Torquey, low rpm tractor like motor that just has that perfect flatfender sound. On the other hand, it's more than just a gutless wonder, it's an expensive gutless wonder. As someone once said, if this engine were to loose a hp for each year, I'd be at negative 1 hp.....

But be that as it may, here's my attempt to build an L134 with some tasteful and semi affordable mods:

-Shaved head slightly for a minor compression increase (~7:1, hack measurement with my kitchen teaspoons)
-Clifford cam grind (less overlap, slightly more lift, should improve bottom, by the dyno sheet only hurts top end beyond 4000rpm, which you can't get past with a stock motor anyway)
-solex carb
-electronic ignition (still on to-do list)
-slightly oversized exhaust (I went 1.75, would do 2" if I did it over)
-free flow intake (still on to-do list)

First up, the Desktop DYNO sheet :laughing:

Image


I did what I could to get the baseline down to the published numbers, then added in my mods to those. If you want the file, just PM me.

Before pics--on the stand
Image


Image


Interesting. GPW head :p
Image
 
#10 ·
Diggin' it.:smokin: I've always thought it would be cool to have a flathead with TBI on it.
Me too. I've been thinking I should do some more research, but off the cuff, I was thinking that the TBI off an S10 2.5 would be about right... maybe get a ROM burner and run GM computer.... or megasquirt...? Like I said, I need to do some research.

What this thing really needs is a turbo :evil:
 
#9 · (Edited)
Head
Image


Block
Image


What the.. :confused:
Image


I did a little research on these pieces of junk (I found in my oil pan). Apparently they are piston "expanders" I think they're to help reduce piston slap? I'm not really sure, but by the looks of things they fell out shortly after a PO's rebuild, two of them made a clean escape, two of them not so much..

So, for future reference, is this good or bad?
Image


Originally I was just planning to tear down, replace the gaskets and run it. The bearing clearance came in a thousandth or so larger than spec, so I decided to at least get it hot tanked and checked out at the local engine shop.

Mmm three mains. :beef:
Image


Pistons (3.125")
Image


Crank (Same stroke as a 572 BBC--4.375")
Image


Ready to go to the shop
Image
 
#12 · (Edited)
Here's the motor back from the shop. In addition to the mods mentioned above:
-Cylinders were bored .040 (apparently the minimum they could get away with to remove all the taper--it started with a stock bore/pistons)
-New .040 over pistons to fit
-Crank polished
-New valves (old ones were pitted and stems were under size)
-New valve guides (old ones were oversized)
-New springs (cheap insurance)
-New lifters (for the new cam)
-New adjusters (old ones were mushroomed)
-hardened seats installed on the exhaust
-fresh valve job
-head and block decked/(cut flat)

I think that's it.

The first night home I was unable to drop this off at the garage, and unwilling to leave them out in the cold (raining, w/ below freezing night temps) so I did the 'smart' thing and hoofed all this crap into my apartment. At least I live on the ground floor!!

Image


Back in the garage....
Spray everything down with POR-15 Metal Ready
Image


I pulled a real :homer: and let the bottom of the head soak in a puddle of this stuff..... had to get it milled a few .001 to get it clean again.
Image


And POR-15 (standard black)
Image


If I had it to do over, I'm not sure if I would paint it first or wait until the build was done. On the one hand, this lets you treat the metal before it has a chance to surface rust or get coated with assembly lube. On the other hand, you have to be really careful what gets painted and what doesn't. This also gives you another chance to introduce garbage into the engine.

Crankshaft. First install dry and plastigauged it. (For the uniniated, plastigauge is essentially precision wax string. Lay a piece of it between two objects and squeeze. The closer the objects get to each other, the wider the string of wax will squish. Compare the width of the squished wax with a gauge that comes in the package. The best way to do this is with a precision bore gauge and a large micrometer, but this is cheaper...) Afterwards clean the wax/goo off everything and reassemble with lots of assembly lube.

Image


Next, check thrust end play. I didn't have a dial indicator when I did the build, so I used a caliper. I rested the base of the caliper on the edge of the crank and extended the depth gauge (stick part) of the caliper to touch the block. I then had a friend pry the crank the other direction and I measured the movement. Sorry, no pics (already takes three hands to do this operation, forget photos).

Image


With the crank in, then I checked the ring gap. No pics, but what I did was put a ring in the cylinder, using a piston as a guide to keep it perpendicular to the wall. Next, checked the gap with a feeler gauge.

Then I assembled the pistons and soaked them in 30W. (shop installed the wrist pin and connecting rod for me).
Image


For installation I used this piece of SH*T ring compressor I picked up at SEARS to keep the rings in check and (2) 4" lengths of fuel tubing on the cap bolts. (the compressor was aweful it kept springing open at the worst times. The little ratchet pawl on the side was completely worthless).
Image


Another note, the rear main seal:
Image


I used a neoprene type two piece seal. The only trick to this thing is that you need to put your RTV on the seal ends, and the lube on the bearing, and not mix either one. I had a lot of trouble getting this thing to fit properly, as shown above, it's actually shifted slightly aft from where it should be. I just kept taking it apart, cleaning everything, lube and goop everything, reassemble, repeat, until the damn thing went together right.
 
#13 · (Edited)
New Clifford Cam (reground my stock cam). I'm not happy with how small the base circle is on this. But, it appears to work fine and the lifters never touch (or come close to touching) the raw camshaft small diameter. I still don't like it. I'm not sure why they took it this far, the original must have had 3/8" between the base circle and the small diameter of the cam.

Image


New lifters and adjusters
Image


Cam in
Image


Lifters and adjusters in (engine shop removed and replaced the valve guides for me)
Image


From what I can tell, you need to put ENGINE assembly lube on everything you want to slide free (such as the cam journals and the lifter bores). The CAM ASSEMBLY lube/grease contains abrasives and only goes on surfaces that you want to wear in to each other, such as the face of the lifter and the lobe on the cam. Don't put it on the bearings! I see this all the time in magazines and on TV, (maybe I'm wrong??)

Jumping ahead slightly...
CCing my heads. I'm sure I'm accurate to +/- a few tablespoons. :laughing:
Image


Image


And setting TDC/checking my piston/deck height with a tile trowel and feeler gauge. Precision tools for the modern day retro motorhead :laughing:
Image


Cam gears installed
Image
 
#14 · (Edited)
One more note. Another mod I made, was to this timing gear oil squirter.
Image


This squirter on the civilian timing gear motors (like mine) has a .070" diam hole. On the later (F head) motors they reduced this down to .040" to increase main bearing oiling. I wasn't able to find a later model squirter, so I had the engine shop tig the hole closed. I then drilled the other side out to .040". It takes some care, but I managed it with a HF bit and my dewalt cordless.
 
#15 · (Edited)
Some other details...

My front pulley had a real large groove in it and leaked like a sive. To make matters worse, the seal surface got sandblasted (on accident). So to fix it, I picked up a redisleeve and some locktight product used for building up metal (can't recall the name right now). The loctite basically filled in the deep groove, the sleeve simply pressed on over the top. One more leak hopefully fixed. BTW, The cap on the right is used to press the seal on.

Image


The oil pickup on the old Go Devil is a floating pivot style.. well, I almost put it back on as is (the screen looked clean and clear) but at the last minute I decided to peel back the shroud and verify that the entire screen was clean.

Nope! :eek:
Image


After a few minutes in the "parts washer"
Image


Parts washer (no pics) = 5 gallon bucket with a gallon of mineral spirits, a wire brush and a magnet on a stick.

... More parts in the paint pile..... I tell you, this resto thing is about 95% cleaning and painting and only about 5% mechanical.....
metal ready
Image


POR15
Image
 
#16 · (Edited)
Here's a quick photo showing how to use a spring compressor. Basically, the spring compressor is a large spindly C clamp. In this photo, one end is pressing against the valve (toward the ground, engine is upside down in the photo) the other end is this little fork that is compressing the spring. With the spring compressed there is room to drop in two tapered locks (one is shown in the photo).
Image


Once the two locks are in place, you can open up the compressor, allowing the spring keeper to slide over the top of the locks, which holds everything in place.
Image


Next it was time to put in the head studs. I used a bunch of white permatex high temp thread sealant on all of these. Just a note/question--now that this is done and running, I'm still getting coolant leaking up past the studs, any suggestions for a better way to do this?
Image
 
#18 · (Edited)
Well... to put this into perspective, this didn't start out as a performance engine build, it started out as a "fix the leaks and check it out" build. This evolved into a full rebuild, as each individual thing was just so cheap. I mean, bore and hone was I dunno, 70 dollars... you could just reuse the valves, but they're only 6 or 7 bucks a piece, hardended seats added maybe 20 bucks to the build, etc. Before I knew it I had a full on rebuild going on. I do wish I had gotten the rotating assembly balanced. It probably wouldn't have cost that much and with only 3 mains, these engines need every advantage they can get to help them stay alive beyond 3000rpm.

In my original research I let others talk me out of balancing it, the argument being that it's a 4000rpm flathead, no point in doing so. The thing is, I often need to wind it out to close to 4000rpm to keep from getting run over, and after reading how these engines tend to eat main bearings when you do that, it would make me feel better knowing it was balanced. I am running a warn OD which helps keep my cruise rpm around 2500-3000.

From what little I've been able to dig up, I think the most useful combustion chamber rework you can do would be to radius the valve side of the cylinder bore (careful not to go down too far) and maybe do a little port work on the manifolds and intake/exhaust ports. I did knock off a few big casting boogers in the ports, but that was the extent of that.

A while after the build was done I picked up a Kaiser Supersonic head and had it cleaned, magnafluxed and resurfaced--so other than a coat of paint it's ready to go on. I believe this was more a hype/marketing device than a real performance head.

So what exactly does it mean to "beam the rods."
 
#20 ·
Those counterweights on that crank are kind of a joke, I don't know if they could do much in the balance dept with that. It would be interesting to know if anything meaningful could be done to it though. I bet you'd have to run lighter rods and pistons to get it reasonable.
Travis..
 
#21 ·
If you think those are bad, you should see a model T! A bent coat hanger comes to mind...

I think with the F head at least, you can get some power out of them. I read a tiny blurb somewhere on what the florida mud racers do, I think I remember them saying something about 6 or 7000rpm!! I can't hardly believe it, but I guess it would be possible.

For those not familiar with these, the F head motors are essentially this flathead engine, but without the intake ports or valves. Instead they run pushrods up to an OHV rocker arm assembly. (intake only). There are rumors out there that back in the day you could buy an OHV retrofit head for the L-134. As cool as that sounds, it would be much easier to swap in an F-134...

At one time the gears were really turning. I was envisioning a custom machined aluminum (two piece) head with direct injection... custom tubular intake/exhaust with a small turbo, oversized head studs, custom copper head gasket, etc, etc.

Back in the real world, I'd just be happy if I could get it to run on off angles and hold 50mph up a hill without overheating...
 
#22 · (Edited)
So the next item is the head gasket.

Image


So here's a question, which way goes up? It has a sheet of foil that wraps around some type of composite gasket material. It is completely symmetrical. I flipped a coin and went this way. (I don't think it matters though). I put it on dry. (also not sure if that was the right choice).

Image


Then I put the head on and tightened it up in the right order per the manual. I for whatever reason chose to use lockwashers on the head, but in retrospect I should have left them off. Next time I have it apart I guess I'll take care of that.

Image


If you notice the front 6 studs are longer, that's on purpose. I've got a 140amp alternator and a York compressor sitting under the workbench (to be mounted some day) and I wanted something that I could tie a double duty bracket in to. FWIW, the stock motor uses the head studs for the oil filter canister and intake piping. I think it's not ideal, but I'm not sure what else to do for accessories. The factory generator mount is down by the oil pan, other than that and the timing gear cover and water pump there really isn't much of anything to hook to.

For head studs, I got the stock ones at Walcks 4wd and the long ones are ARP's (after spending hours trying to find a domestic kit that had what I needed, I gave up and called up ARP, gave them my visa and these showed up a week later).

Also, wanted to put in a plug for walcks4wd.com. If you have an old CJ and need parts they are GREAT!! They stock nearly every single piece for these old jeeps and their prices are good. Every time I've ordered before lunch the parts have shown up the next day. I've only had one backorder ever, and it showed up about 5 days later. The only bad thing is that they pretty much only stock the same Omix Ada and Crown parts that everyone else stocks... so expect JC Whitney quality unless it's something special.
 
#23 · (Edited)
Flipping the motor back over, here you can see everything buttoned up and ready to go. Got my rear main on correctly (finally), oil pickup mounted, oil pump mounted (external BTW), tripple checked to make certain that every single oil galley plug is in place...
Image


Oil pan on
Image


A few notes I wanted to add about the oil pump (grey/silver thing on the side of the block). There are two versions, one for the timing gear (most civillian) and one for the timing chain engines (all MB/GPW). The difference is that the camshaft spins the other way on those, and the gear on the camshaft and oil pump are different. As a result, the distributor actually spins the same direction for both models, but the two oil pump (gears) are different and not compatible. I found this out the hard way, my first oil pump was for the other style. This oil pump, btw is a Melling.

I have some more oiling system tech on the way, I'll take care of that in the next post.
 
#463 · (Edited)
A few other finishing touches...

Rebuilt the fuel pump (fun little rebuild). I would really like to find a glass site bowl for this...

Image


Cleaned up the distributor. I need to actually rebuild this with new bearings and a Pertronix pickup. As another option I see that Omix Ada now has an all new electronic distributor, and it actually costs about the same as a retrofit kit for my old dist. I'm a little wary of an Omix dist.... any thoughts?

Image


Since there's no drive gear on this (it is driven by the oil pump) it wouldn't be that hard to maybe change to an completely different dist. It has me wondering what it would take to do a GM HEI. This one spins counterclockwise, I think the GM's are the other way...
Very nice build thread. Lots of good, useful info I've learned.

One quick question, if you're still monitoring posts on this thread, is; do you need to pull the distributor (as it's driven off the oil pump) in order to remove the oil pump? I've got to replace the pump in my engine... or, find the mysterious reason I've got 0 pressure.

Funny part; look all over the Web for info, and find the info I want on a site I already visit, from a guy, whom lives in my same country, probably on 10 miles from my house.
 
#24 · (Edited)
L-134 Oiling

The oiling system on this motor is really, really simple. Oil is sucked up through the floating pickup, through the (externally mounted) oil pump and pumped into the main oil galley.

This galley has passages leading to three crankshaft mains and four camshaft journals.

Oil flows into the camshaft journals and (as far as I can tell) spills out onto the lobes, coating them and the lifters and flinging up into the lifter galley, where it dribbles back down through the lifter bores.

Oil that flows into the three mains then flows through passages in the crankshaft out to the connecting rods. Holes in top edge of the connecting rods squirt the cylinder bores.

At the front end of the engine, the timing gear squirter (shown in an early post) sprays the timing gears.

So what's missing? How about an oil filter!

The oil filter on this motor is, as far as I can tell, a retrofit that Willys started with the military applications. They take a tap off of one of the main oil galley, through the filter, and then return it on the side of the timing cover, lubricating the timing gears and returning back to the pan.

The drawback to this design is that in order to filter out a piece of garbage, it might need to pass through the bearings a couple of times before it finally happens to go through the filter.

The other drawback, is that your oil filter has a real effect on the oil pressure in the galley. For example, if you were to have a really high flow filter and filter plumbing, it would essentially be like running the engine with a missing oil main plug!

On the other hand, if you have a clogged filter, no oil will flow through it at all.

On my jeep, when I got it, it had this fancy screw on filter adapter. As a result (partial result, it was an old motor) I only had around 5psi at idle, never more than 25-30psi no matter what.

Image


So I did some research to see how the factory took care of this. I read rampant rumors of everything from "nothing" to a check valve to a small orifice.... I tried very hard to find an original style canister filter, but never succeeded. In the end I ordered up a repop and here's what I found:

Image


A TINY hole:

Image


Filter Element

Image


I'm not sure what size this hole is, but I think this is a pretty good answer to the problem. So if you have a similar motor and want to use a standard screw on filter, you could probably safely do so if you were to seal up the return and add a small orifice. If I had to guess on size, I'd say around 1/16". One of the old greybeards I found in some engine shop said they used to braze up a pipe fitting and drill a .070" hole when doing custom filter setups.

You could also add a needle valve on the return line and adjust to the point that you had some oil flow, yet, also had okay oil pressure at idle.

When you think about all the oil flowing through that hole (I'm joking) you really realize just how little oil actually gets filtered in these motors. Oh well, it worked for 61 years, I guess I shouldn't worry about it ;)

Between this, my fresh rebuild and new oil pump my oil pressure now is 20-25 at idle (warm), and around 40-50 otherwise. I believe the oil pump has a relief valve at 50, so it shouldn't ever go higher than that.

The only thing I can't explain is that sometimes while cruising it will bounce between 30 and 50. It sort of acts like a gauge is going bad, but I've got a mechanical gauge, and otherwise it always holds steady. The only thing I can think of is the relief valve is popping open, pressure drops, builds, relief valve pops. :confused: But it only does it randomly.
 
#25 ·
Does this engine have a closed crankcase PCV type system? If not, I understand it helps alot in these older road draft tube engines to convert them over to PCV. Helps keep the oil clean by drawing combustion remnants into the intake and re-burning them instead of letting them get trapped in the oil.
Travis..
 
#26 ·
Sure that sounds reasonable. This actually does have a PCV type of system. I'm not sure if it's actually working on mine, but I do have it ;) When I opened up the valve to clean it out, a spring shot out and some other parts too, seems like I heard something fly behind one of the shelves in the garage.... Anyway I gathered up what I could find and put it back together... No idea if it's right or not. :homer:

On the "list" was to build a little spacer/adapter/manifold between the oil pump and block that diverts all oil through a remote filter, then back into block. The other trick would be extending the gear drive to reach the camshaft. I think it's possible. Not real high on the list though :D
 
#27 · (Edited)
A few other finishing touches...

Rebuilt the fuel pump (fun little rebuild). I would really like to find a glass site bowl for this...

Image


Cleaned up the distributor. I need to actually rebuild this with new bearings and a Pertronix pickup. As another option I see that Omix Ada now has an all new electronic distributor, and it actually costs about the same as a retrofit kit for my old dist. I'm a little wary of an Omix dist.... any thoughts?

Image


Since there's no drive gear on this (it is driven by the oil pump) it wouldn't be that hard to maybe change to an completely different dist. It has me wondering what it would take to do a GM HEI. This one spins counterclockwise, I think the GM's are the other way...
 
#28 · (Edited)
And here's the motor basically all together.

Image


Image


I decided to run hard metal lines from the canister filter. I think this is fine, but about a month after I got it running, one of the lines cracked at a compression fitting. I think I just overtightened the fitting, but it does have me wondering a little bit. I've carry a spare set of soft lines and a pipe plug in my tool bag just in case it happens again. The hard lines, BTW are some kind of coated line I got a NAPA. It's okay, but the coating gets chewed off by the flare tool.

You can also see the intake manifold that I cleaned up. I sandblasted it (and the exhaust) and gave them several coats of POR15 high temp manifold paint.

The accessories (fuel pump bowl, dist, etc) got a coat of their "bare metal" color paint. Everything else has a topcoat of their black engine enamel.

I'd really like to swap the fuel pump bowl to a glass one, and get rid of the crappy plastic fuel filter in favor of a metal one. Every time I've tried to change that filter I've broken the nipple off the side. I really like having something clear to see what's happening with the fuel... a few times it's shut off on me, and it's really nice to be able to see at a glance if it's a fuel problem or not.
 
#29 · (Edited)
Chassis Resto

Originally I had arranged to have a local guy sand blast the chassis ($300) but for some stupid reason I decided to do it myself.

It started out innocently enough. I had a spare evening, a beefy 5.5" grinder, a cup wire wheel, and a pile of PPE.... so why not.

Image


Before I knew it, I was a third done, so why bother with the sand blast....

A few more days later...

Image


Image


So I did it myself.. but would never, ever, ever do this again. My friend's garage is toast and even though I was wearing a P95 filter, I'm still not sure how 'healthy' this was for me. My grinder will never be the same either....
 
#30 · (Edited)
A few days later (after the dust had settled into a nice sediment layer) I got around to the POR-15. First step was a thorough wash in the driveway with their Marine Clean.

After that had dried off, I then hit it with a coat of Metal Ready.

Image


After letting that work for awhile, I washed it again and allowed it to dry for a few days.

Then started the POR-15.

Image


And done

Image


You can't tell in the photos, but I also gave it a coat of their "Chassis Black Topcoat". I liked their other products, but this stuff was crap (for me). Part of the problem was cold. It was all I could do to get the garage up to 50 (mostly it was 40-45). At that temperature, this stuff is like rubber cement or warm peanut butter. It was AWFUL to paint on. It went on thick and gloppy and stringy, didn't want to stick to the base coat, and tended to sag and ripple as it dried.

In general I HATE painting and this stuff only reinforced my hatred for that foul smelling sticky goo. :mad3: Even worse, it really didn't stick worth a darn to the base POR-15. Their engine enamel seemed to work a lot better.

While I'm venting about POR-15, I'll mention one other bogus product--their paint brushes! They leave bristles behind everywhere. I switched to wally world foam throwaways and they worked okay. They tend to disintegrate, but a bag of them was only like 3 or 4 bucks.

For a paint tray I used those little shorty wide rim clear plastic party cups. Worked great. A bag of them is only a few bucks, when you're done, toss 'em. No clean up or contamination to worry about.

On a lighter note, I was SO happy with the condition of my frame. Except for a spot or two on the battery tray, not a spot of rust on it anywhere. :) Although I started with a nice running flatty (and didn't need to given the level of work I'm putting in to it) it was SO nice to not be fighting rust and PO f-ups on every turn like I would have been on most of the other 'resto candidates' I looked at. To me, that was really worth the couple thousand extra I spent up front.