Pirate 4x4 banner

"The other woman build"

115K views 313 replies 77 participants last post by  BCzuk  
#1 · (Edited)
I picked up my 65 cruiser about 5 months ago. My last build was a cherokee xj and I was sick of the unibody. Anyway, my girlfriend calls the Fj "the other woman" so it seemed a good name for the build. It's got a 350/350 combo and saginaw power steering on it already, but which ever previous owner did the swap was a real hack and I've got to redo most all that they did. I've been collecting some parts and now that I've sold my XJ, I should be able to move along on it a little more steadily. Plans are:

FJ40 front springs/FJ55 rears (already got'em)
FJ62 axles (already got'em)
Full cage,custom bumpers, tire/cooler rack, etc.
Suspension seats (kept from the XJ)
Full Autometer gauges (kept from the XJ)
Bilstein 7100's w/res (overkill, but again, carried over from the XJ)
38x12.50x15 swamper sx's on Allied 15x8 beadlocks w/2" BS

Those are the highpoints.

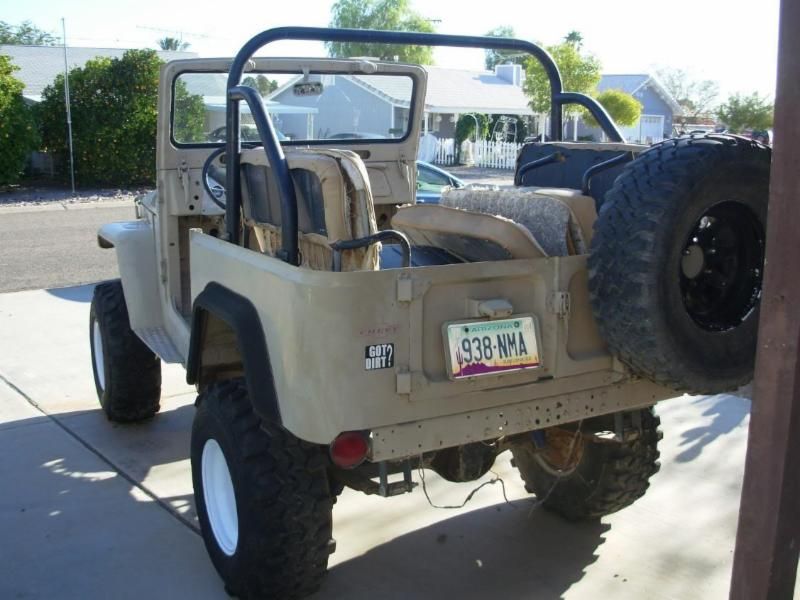
Here are a couple of pics the day I brought it home

Image


Image
 
#3 · (Edited)
Here are some progress pics of the axles, and the leafsprings:

FJ40fronts, and FJ55 rears, all cleaned up, all ends beveled, painted, and two coats of slip plate on all mating surfaces. (wholly crap was this alot of work!!):
Image


Here's the FJ62 front axle I started with:
Image


I got this spacer/sleeve and a corresponding longer chromo shortside 30 spline inner from Dave Gore. This will give me a little more width and get my spring perch a little further from the pumkin. The rest of my 30 spline Longs are on the way.
Image
 
#4 · (Edited)
Here's the ugly mount it had for the steering box:
Image


Got the mount off, and the frame cleaned up:
Image


I just can't understand why someone would do this! I've got to figure out how to fix it:
Image


That's where I'm at now, I've got to get my other knuckle cut loose so I can turn it, and then get the axle mocked up under the cruiser so I can get the pinion and knuckles set so I can weld it all up, and add the knuckle gussets.
Then I can assemble the axle so I can measure and order up my 4x4 Labs high steer. By the way, please don't flame me too bad, but I've already got a set of six stud knuckles from you know where, I got them a while back before I found the thread about it and now that I've already got them, I m gonna run'em.
 
#13 ·
I just can't understand why someone would do this! I've got to figure out how to fix it:


QUOTE]


Somebody needed a VIN me thinks? Nice job on the patch. If you look at my Tinker Toy build you can see that yours is a much nicer starting point than what I started with. What part of Ariz are you in? Got anymore pics of the rest of the rig?


Welcome to Pirate! :flipoff2:


Chris:cool2:
 
#6 ·
The spacer is all one piece, you pull the knuckle out, put the spacer in, and then put the knuckle back into the spacer. I should have taken a pic before I installed it cause it's not coming back out now! Here's a link to the thread where I found out about them.

http://forum.ih8mud.com/hardcore-corner/196544-notched-60-front-axles.html

I'm working on fixing the front crossmember right now, and after putting a straight edge across it, I just discovered that it's bowing where it was cut. I'm in for some fun with this one. :D
 
#8 · (Edited)
I used a jack to get the crossmember straight again, and welded in a patch over the hole in the backside of the crossmember. Then I made this piece to fix the front, still got to make a small peice for the underside and weld this out. Shouldn't be able to tell it was ever there after I weld and clean it up. Almost hurt to go back and cut a hole in it for the steering box! Not alot, but it's Easter, got to do the family thing!
Image
 
#10 ·
Is that slip plate box have aerosol or quart cans in it?
If their quarts where did you buy them?
All I could find when I did mine were spray cans so I could'nt get a very thick
coat on them and rust is already poking thru.

Looks like its going to be a nice build BTW!
 
#11 ·
They're spray cans. I painted the leaves with two coats of satin black rustoleum first, and then applied the slip plate. I figured that would help keep the rust at bay. After reading a bunch of threads about the slip plate, it sounded more like just a spray on lubricant, and not so much like a paint.
 
#14 ·
I am brand new to cruisers, had no idea that a VIN was stamped there! I guess that would make sense. I don't have many more photos of the rig yet, but I plan to take pics of everything I do before and after. The motor mounts for the 350 are pretty ugly too. In fact, the cruiser looks pretty good from a distance, and there's little to no rust, but thats because someone "fixed" the rusty areas already and some of that is ugly too. I'll have to take some pics and add them. I live in Circle City, it's about 45 mins. N/W of Phoenix on Grand Ave. headed toward Wickenburg. Very small, most people drive by and don't even notice we're there.
 
#22 ·
I live in Circle City, it's about 45 mins. N/W of Phoenix on Grand Ave. headed toward Wickenburg. Very small, most people drive by and don't even notice we're there.

I should be headed through there in about 3 weeks headed to Phx... Might have to stop and have a look-see... (Which one of the three houses are yours?) :D

Need anything from this side of the world?


Chris:cool2:
 
#16 · (Edited)
Got a little more done today. Finished the repair to the crossmember, cut the new holes for the steering box, and built the new front bumper. Still got to get the steering box mount finished and installed. Unfortunately the previous owners "mad fab skills" weren't limited to the cruiser itself, they drilled out the mounting holes in the steering box so I've got to get a new one. I can't decide whether to go get a new one at the local autoparts store, or order one from PSC/or? that's tapped for Hydro already. Can anyone suggest which steering box to get, as in from/for what application?

Here's the pics:
Image


Image
 
#17 ·
Chevelle, Nova, Station wagons, Oldsmobile cutlass (70's vintage) S10 pickups I think.... Pretty much just wander the junkyard looking for a GM box that mounts inside the frame with 4-bolts attatchment.

Also look on IH8MUD in the tech section on the homepage for old writeups. May be some good info there with more applications.


Chris:cool2:
 
#18 ·
I've been searching and reading like crazy on here and IH8MUD! I think I will go take a walk through my local junk yard and see what I can find this weekend. I need to find a steering column too. I seem to remember there being a couple of S-10's and XJ's there last time I was there. I've had horrible luck with steering boxes from the auto parts house, got one for my XJ with a lifetime warranty, and had to replace it under warranty four or five times in four years. Got excessive play in the sector shaft every time. I think a junkyard one could only be better!
 
#20 ·
Great, there goes the neighorhood, I guess they'll let anyone in here. Yeah, it's turning into a snowball like always. I've got shiny new parts piling up in the house cause I don't have enough "quality time" with the LC. I'm sure you'll be done before me. But when I do get done, I should be able to drive this thing around town, and wheel it hard. This thing will be a blast! Go forward with your plan for the four door cab on your frame and maybe I'll have a chance at getting done at the same time as you.
 
#21 ·
drive it around town!!!!!!!!!!!! you dont even live near any towns to drive to(and a cirle of 3 houses doesnt count as a town). you aint wheelin if you are "driving around town" gotta make a trailer queen and spend $4+ a gallon in your tow rig to get it to the trail. put the brady bunch kids to work and get that mawl crawler dunn. :mr-t: MDD out!!!!!!!!!:mr-t:
 
#24 · (Edited)
Well, I got the frame plates done, shackle mounts on, and everything welded out up front. Now I'm waiting for my new steering box to show up from PSC so I can get the mount for it finished up and installed.

Image


Image
 
#26 ·
I made the frame plates myself and I didn't see any numbers on the frame, I guess if I covered them up then my cruiser ignorance is really shining through! I hope there's a VIN somewhere else! Thanks for the compliments on the fabwork.
 
#28 ·
No new pics at the moment but I got my AA twin stick kit in (thank you Georg!) and after closer inspection, the adapter to mate my th350 to the xfer case is an older one from Downey that is very short. The AA bracket is made to bolt to thier adapter so I've got to fab my own mount for the twin sticks. Probably going to pull the xfer case to clean it up, fab up a case saver, and fab up the mount for the sticks. I'll post pics of what I come up with. Other than that, I'm still waiting for my steering components to show up from PSC so I can get the box mount done, paint the front bumper and frame, and mount the new springs.
 
#29 · (Edited)
Finally got some more done. My steering stuff came in and I got the box mount finished. The box BARELY fits in there. It took some effort to get it located and have room for the shackle and it's bolt, and have room for the connections for the hydro assist (real close to the crossmember). Gotta box in the framerail on the other side tomorrow.

Image


Image
 
#31 · (Edited)
Well after lots of reading and changing my mind several times, I finally ordered my wheels and tires. I'm getting 17x9.5 allied beadlocks w/2.75 bs, and 37"x14 bias Iroks. Oh and I know that the 36" Iroks are a tiny bit taller, but the apparently the 37's have a more square tread and I dont want them to look like baloons! I'll get some pics when they show up and I get all five of them mounted up, I'm thinking thats going to take some time.
 
#33 ·
My front axle and rear diff are now works of art thanks to a good friend of mine that was kind enough to break out the TIG and weld up my knuckles, spacer, and my rear diff. My camera is on the fritz, I'll have to break out the GF's nice one tomorrow and post up some pics. I did get the front leaf packs fixed this week and repainted. I had my head in my ass and drilled the wrong leaves and ended up with the military wrap at the front with the shackle instead of at the frame end. I also bought a sandblast cabinet and cleaned up the nuts and washers to reinstall the third members. I stopped at the Toyota dealership and picked up new gaskets for the thirds, and new cone washers for the hubs. NOT CHEAP!
 
#34 · (Edited)
Well, here are a few progress photos.


Here's the rear axle truss tacked in place, and the mount for the antiwrap bar mount I made tonight. I'm going to box in the mount, hopefully I wont regret using 1/8" plate. Should be able to get'em both welded out and finished tomorrow.
Image


This is the finish welded spacer/sleeve on the short side of the front axle.
Image


Got two tires mounted. When I get the other three done I don't want to see my torque wrench again for a long time! The 37's already look small, probably the 17" wheels that make them look smaller.
Image


FJ55 rear springs. I have since removed another leaf from all four packs, it was just too tall. Hopefully the antiwrap bar will help the leaves live a little longer.
Image