

According to the tag this Ford 205 is a 78 (36 years old)... This is my path to rebuilding it…
In case you didn’t know here are some specs on the 205. (Just what I have read on the www)
Was used by the big 3, had a production run from 69-93, the case is made in both drops, made in divorced and married setup. Also the case has numerous spline configurations on the outputs; it is generally held that the 32 spline outputs (front) are the better of the factory setup’s.
Dry weight is 140 lbs ish.
1.00:1 high
1.95:1 Low
Good links I have followed...
NP205 Rebuild Guide (missing idler setup)
NP 205 Rebuild and Info - The 1947 - Present Chevrolet & GMC Truck Message Board Network (good one)
http://www.jbconversions.com/pdf/2800.pdf (the best, building a lomax)
It had never been serviced other than new seals and to grind the shift rails (according to the original owner), its second life has been in a crawler for the last 6-7 years. It made a lot of noise bearing/gear rattle (its always been full of 90w), but hadn’t popped out of gear yet.
Right after pulling it draining its dino blood…

First I removed the rear output (unbolts and pulls apart), then the aluminum bearing retainer for the front output (then pull the front output assembly)…

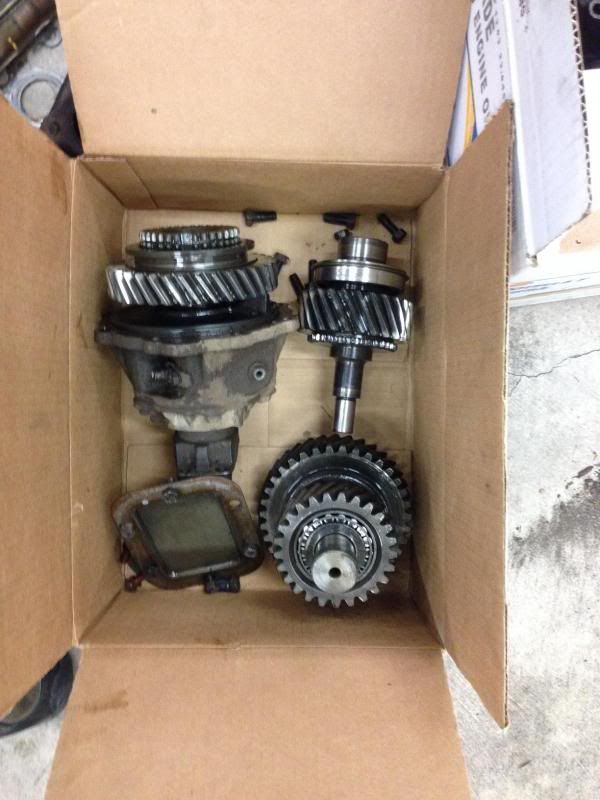
Rear output assembly is upper left, upper right is the input, and bottom right is the idler.
What is left behind after the rear output is removed (shift fork, slide ring), and back of input.

Front output sitting in aluminum retainer, and output and input bearing and seal retainers…

In case you didn’t know here are some specs on the 205. (Just what I have read on the www)
Was used by the big 3, had a production run from 69-93, the case is made in both drops, made in divorced and married setup. Also the case has numerous spline configurations on the outputs; it is generally held that the 32 spline outputs (front) are the better of the factory setup’s.
Dry weight is 140 lbs ish.
1.00:1 high
1.95:1 Low
Good links I have followed...
NP205 Rebuild Guide (missing idler setup)
NP 205 Rebuild and Info - The 1947 - Present Chevrolet & GMC Truck Message Board Network (good one)
http://www.jbconversions.com/pdf/2800.pdf (the best, building a lomax)
It had never been serviced other than new seals and to grind the shift rails (according to the original owner), its second life has been in a crawler for the last 6-7 years. It made a lot of noise bearing/gear rattle (its always been full of 90w), but hadn’t popped out of gear yet.
Right after pulling it draining its dino blood…

First I removed the rear output (unbolts and pulls apart), then the aluminum bearing retainer for the front output (then pull the front output assembly)…

Rear output assembly is upper left, upper right is the input, and bottom right is the idler.

What is left behind after the rear output is removed (shift fork, slide ring), and back of input.

Front output sitting in aluminum retainer, and output and input bearing and seal retainers…


