Pirate 4x4 banner

Ramcharger build on 49" IROKs (project thread)

1 reading
276K views 579 replies 103 participants last post by  4x4BT  
#1 · (Edited)
Ramcharger build project (stretched, chopped, bobbed, doved, & lowered onto 43s)

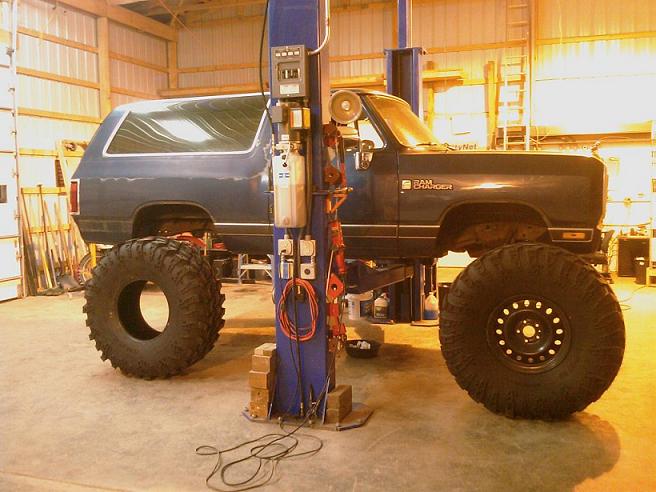
Ok, here goes... 1990 Ramcharger going up on 49" IROKs.
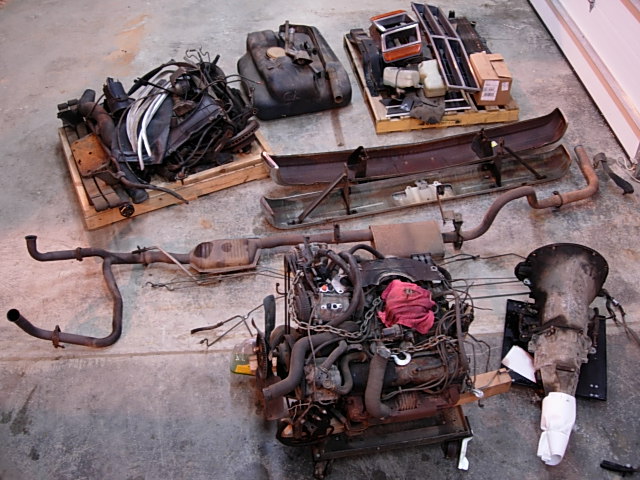
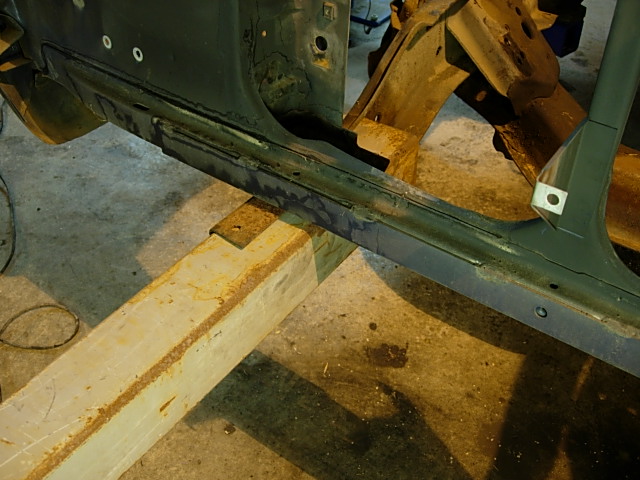
Plan is to move the rear axle rearward ~6" while opening up the fender well ~12" and move the front axle ~12" forward while flat fendering the front fenders. Goal is to build a 'general purpose' off road rig and keep the roof height at 8' or below but still allowing for a 'decent' amount of flex. The 1990 Ramcharger is 2wd & basically rust free from GA. 440/727/205 combo going in... at some point upgrading to a 3sp xfer. Standard locked D60/D70 full hydro steering combo. Other bells & whistles will fall into place after I get the suspension relocation brackets/crossmembers fabricated and the chassis rolling again.

Image
 
#3 · (Edited)
I haven't thought that through yet... would make fabbing the cage easier when the time comes, but it's nice cover for my two boys for now. I actually started removing the top of my 85 charger via the rocks at Tellico years ago. :cool:
Would be nice to at least have quick-release removable rear side windows for the time being...
 
#5 ·
Is it going to be that tall? Looks like you can lower it somewhat if your cutting fenders but Im guessing its a mud truck correct?
Are you going to upgrade your shafts to handle those tires?
 
#6 ·
I hope not... :cool: I know how much lift it took to make my 85 ramcharger comfortable on 40" tires. Trying to base my calculations off of that example and find the fine line between articulation and fender hacking...
Mud/trail truck more than anything else I guess... not the plethora of rocks around here like out west etc. D60 Stub shaft upgrade is high on the list... we'll see how everything else holds up.

Side note - anyone got the itch for a pile of 2wd ramcharger parts??? :cool:

Image
 
#7 ·
Ok - onto the first fab session... extending the front frame rails a bit ~8". I had an old parking lot light pole lying around which is 4x4-3/16" wall square tubing... fits in the frame nice and snug. I can fab in a new crossmember under the radiator support for the front body mounts - and tie in the extensions out front. Should make a nice little flat spot for my hydraulic winch when complete. Anywho - my main concern is with the stength of what I'll add compared to the original frame strength right at the rear most tie in point under the hood. I'd rather the factory frame not decide to bend in this location. :cool: Any thoughts or concerns?

(square tubing is not cut to length yet obviously...)

Image


Image
 
#8 ·
Similar plans here as far as moving the front axle forward. I fabbed this frame extension out of channel:

Image

Image


When I get to the point that I've going to shift the axle forward, I'll be cutting the front crossmember out like you did and shifting the extension back in the frame to gain as much strength as I can from it, then box the frame back behind the engine crossmember and brace in the engine crossmember to the extension. The grille and radiator support will be modified to sink the Braden back inside a bit.

We did a similar setup on a Toyota Tacoma that we did a SAS on but used square tubing hammered into the stock sheetmetal frame rails and plug welded. It has held up real well at Tellico and a few other tough runs. We didn't brace it as much as I intended to on the Ramcharger due to the much lower weight.

Image
 
#13 ·
Yeah I gotta know about the axles. I'm assuming your gonna throw some chromo's under it atleast? I've seen big blocks and 44's snap 60's all day long with chromoly shafts in them. First time you turn the tires and romp on it....... :(

Good build though.
 
#14 ·
Sweet build hope to see lots of pics love pics . The Frame is my concern also my RC frame has cracked and broke so manny times but i have not reinforced it much but im runing rocks with 44 '' tires and leafs front and back with dodge 360 727 208.

I have about 10 ''- 11 '' of lift and im right under 8 ' tall . So what kinda axles will be hard to run 49'' and not brake unless its rockwells .

Image
 
#18 ·
Glad to see more RC's being built. Keep the updates coming. Mine's down for a trany rebuild right now.
 
#21 · (Edited)
The electric ones are pretty rare as most trucks ended up with commercial Ramsey or Warn electric winches. A Braden is an industrial grade winch like a Garwood or Tulsa. Braden winches are still made by the PACCAR Winch Division but the MU8 (mechanical PTO) and HU8 (hydraulic) 8k lbs winches are all that is available. The electric EU8, the great, great grandson of my winch, is no longer available though the HU8 and MU8 can be converted to electric. Prices can vary depending on the truck service company you are buying from but they are generally about twice as much as the popular commercial winches. I lucked out and got this one for $100 in a non-working condition and it took me 14 years to gather all the parts to rebuild it last summer.

Oh, and I do have a little bit of wire rope on it now but I need to buy a new 150' length:

Image


And to keep from completely hijacking Jopickens' thread, I have also thought about the removable rear windows. I had thought of just filling them with sheetmetal like a panel wagon and then perhaps putting in a common RV window that would open, but that's a lot of time and trouble. My thoughts on removable windows would be to put a track at the bottom for the glass to set in, cover the pinch weld with a common door weatherstrip available in bulk rolls, and have the glass drilled for strap cleats so that the glass could be set in the track at the bottom and then Velcro straps mounted to the inside ceiling could be fed through the cleats and tightened down to hold the top of the window tight against the seal. The only problem I have with the idea is the curve at the top of the window, which could cause some problems if the window doesn't fit just perfectly against the curve of the body as putting it in a bind would probably bust the glass when you hit a good bump.
 
#25 ·
Looks great, can't wait to see how things go for this build. Funny thing is that I'm about to start tearing in to my '89 2wd Ramcharger to make it into my wheeler. Not going to the extreme you are...yet, but will have to figure out some of the things your doing.

On mine, I'm going to start with just a D44 and the 9.25 axles with 35's. Shackle flip in the rear, parallel 4-link in front. Since the body is all rusty, going to cut a decent amount of it off. Hopefully for under $3k I can have it rolling 4x4 to "test and tune" till I get some 1tons for it, and build the doubler and the 4-link in the rear, and on and on. By the time it's "done" my wife will probably :mad3:.

Great start, I'll be watching this one for sure.
 
#26 ·
Ok ok... you guys got me. I've been perusing the rockwell pages at pirat4x4 for the last couple days. I now see how many things in my build would be actually simplified by using them. So... should I snag a couple of the axles out of the old army truck that was given to me years ago??? I have had it squirreled away for a flatbed hauling truck project that I'll probably never get to... It does appear a bit unique being single rear wheeled but might very well have the same WMS width as the dually trucks etc.
Honestly I've yet to really measure/spec out any of the drivetrain components. I'm making the assumption it's riding on the typical 2-1/2 ton rockwells. Can anyone help me identify it? Best I can tell It was once a military fire truck of some sorts... body tags on the compartments for hoses, pike poles, ladders etc. I do know it spent its last years (last road legal year was 1978 by the license plate still attached to the rear) as an explosive hauling vehicle on a local strip mine. I'll get some more detailed pics of it online and post a link to them. Anything/anywhere in particular on the truck I should be looking at/for to help?

Thanks again for all your feed-back and encouragement...

Image
 
#27 ·
Go for it! Rockwells are the shit for big building! And as I recall you want to look at the axle tag for it to say Timken, or Rockwell on it... avoid it if it says Bendex. Those are the crap ball type axles that are super weak (in rockwell standards).
Keep up the good work and looking forward to the build!
Matt
 
#29 ·
most people i have talked to said the ball typ u joint is just as strong but that are a pain if you have to take them out and you need to keep the boots in good condtion and full of grease . but like the other guy said can replace them later with u joint style shafts .

i can send you some more pics of my set up if your doing springs .
and that truck being single rear wheel its the same as if its a dull wheel. how manny lugs are on the axles ?
 
#30 ·
Ok - time for some wheel fabrication chit-chat - will probably start a separate thread once I really get into them so others can more easily find that small 'part' of this truck build.

Image


I started making wheels almost 4 years ago... yes I've had a one of my 49" iroks since February of 2004!
My plan was simple... I picked up nine 20" x 8" steel spare tire wheels from half-ton hemi dodge trucks with the 20" wheel package for $10 / wheel!

Image


Here is a pic of the 49" irok stuffed on the 8" wide wheel for fun...

Image


I had intended on cutting off the outer lip of two wheels with the plasma cutter on my turn-table, knock the center out of one side, weld the two back together and end up with a 12-1/2" wide 20" wheel (~5-3/8" backspacing). Here is a shot of the prototype I threw together years ago...

Image

Image


Lastly - cut the center (~9" diameter or so...) out of an old set of heavy duty 8 lug wheels I had lying around, measure three times :cool:, cut the center to match out of the 20" x 12-1/2" 5 lug wheel, and weld in the 8 lug center.

Image


Now I'm thinking, after reading various posts on here, I might as well make this a split-bolt-together-style-wheel and run a pvc insert for the double beadlock effect. Add some rim/wheel edge stiffners... and now since I'm going to run rockwells, cut out some 20" 6 lug rockwell centers to weld into these 20" wheel shells I can make so easily and cheaply.

One thing I'm having a hard time finding is the ~20" ID pvc inserts... which I assume some folks out there have made out of plastic pipe. I can't find any lying around... I do know that 20" water pipe can be had with a 20" ID and just over 1/2" thick wall... but around here it's $620 for a 20' joint of it which I'll only need ~4' long piece to do four wheels. I might just fabricate the 'gerbil' cage beadlock inserts out of 1/2" to 3/4" steel tube if I can't find the correct size pvc/plastic pipe/tube insert etc.

Second big question that I haven't been able to dig up much detail on... I know the hummer wheels use a large O ring to seal the wheel halves together. Do the custom split double beadlock wheels all use large O rings for sealing... or could you get away with siliconing the bolt flanges on each wheel half where they meet/bolt together and get that to seal? Or possibly just use two large O rings, one on the outside of the bolt circle and another O ring, slightly smaller in diameter, on the inside of the bolt circle - and do you think that would seal/stayput on the flat flange surface (which will probably be 3/8" plate, 2" wide, with 20-30 bolts / wheel etc.)?

Hope all that made sense...
Of course the easy thing to do is go buy a set of 20" double beadlock wheels... but what fun is that?
 
#31 ·
There is a thread on Alaska 4x4 network that details homemade double beadlocks,. Best thread I ever read.
One of his options was riveting together a piece of 1" thick rubber to the proper diameter. 12 bolts hummers use rubber inserts so the logic is sound.
I'll see if I can dig up the thread for you tonight, it's bootyfab at it's finest(not a cut at him, it's a :grinpimp: setup, and I'm jealous)