

I've gotten some PMs regarding this thread Sorry about the pictures webshots closed up and it'll take me awhile to remember what pictures used to be posted where, I'll be updating it as i have time
Since this took so many turns Updated list of mods:
Some mods
-CJ body onto a YJ frame
-AMC V8 bomb proof bolt in motor mounts in YJ frame
-Recessed 8274 and integrated front bumper build
-Beefed up 8274 AK8.7 style
-custom steering box bracket and moved steering box forward for steering and to have steering hoses clear big radiator and for stretch, Used a Wagoneer pitman arm
-flat belly pan
-seperate tranny crossmember
-floor pan mods and new tunnel
-replaced rear crossmember and installed custom 29 gallon fuel tank that clears stretch hangs down no more than a stock tank and is high and tight to the body
1" BL
-Hydroboost brakes
-Metal Claok front fenders (yeah i cheated and bought em)
Drivetrain:
-Cam'd AMC401 w/ TBI (existing)
-Early GM NV4500 6.32:1
-4.3:1 Atlas
Suspension:
REAR: xj rear springs SUA used for stretch with hangers partially frenched into the frame
FRONT: Wagoneer front 44044 springs or RE1455's for stretch SUA (also ended up running RE1455's for .25" less stretch if you redrill 2nd leaf and flip around but better flex and softer ride, slightly longer than the 44044's ran both and they work well)
Axles:
REAR: Currie Iron Rock Jock dana 60 HP 4.88's using an RD166 ARB with super dana 60 10" R&P, semi floater 5 on 5.5
FRONT: Low pinion 608.9, basically a 44/60 combo using a RD147 ARB and JK rear D44 8.9" ring and pinion with 60KP C's, machined KP knuckles and 35 spline shafts 5 on 5.5
some how slipped another project in an Old school hunting jeep project
- stated with a cheap wrecked CJ7 tub and frame
- stretched steering crossmember to allow steeing box to be moved forward
- garage narrowed a 1979 waggy dana 44 4"
- installed a Power Lok limited slips F&R
- 1 ton steering, HD steering bracket and brace
- JK 8.9" 4.10 R&P in rear scout housing
- AMC 360 2bbl motorcraft, T18 / D300.
- hydroboost brakes
- 2.5" wide springs all around u bolt flips
- 2.5" lift with 31's
I tried to link various threads with relavent info with bold underlined yellow text throughout the text of this build thread
-----------------------------------------
Original top post:
Never thought much of documenting the progress of this jeep its just a jeep but i guess now i should throw up the history before i post up the mods i am planning and hoping to add into this. actual recent photos to follow when i get around to it in a month.
So heres the deal I tried for years to keep the classic CJ look but painting and tapping out my front fenders every year is getting old between trip 2 and trip 8 every year something smacks a rock and its usually influenced by a little attempt at a line i know better than to try. So its time for a tear down and a few upgrades.
Shes not going much taller but the ultimate objective is SUA 2" + wheel base stretch in the rear, a wrangler frame swap since mine looks like a pretzel after towing a FJ from WH3 on fordyce to the top this last trip and never seeing the front tires hit the ground. I want to attempt to fit 37's down the road and not look like a buffoon on the trail with a hacked up pieced together POS with out spending a fortune. So you can bet some tube fenders probably with a 3" flare will be on the front. And finally i want to continue trying to continue to piss off all the nay sayers about being able to keep up on the trail since i am still SUA. lots of effort and little upgrades... incognito approach. i probably could link it and do coil overs for the amount of thought and work going into it. Heres some history on what she was. And now you know what i THINK my plan is, going with longer springs front and even longer yet in the rear with no lost approach and departure angles from what i had, step up tire size, step up diff strength, t-case stength and work out some bugs with cooling..... i hope to yield good results accepting that its still sua and will have limitations.
So what worked for the last 9+ years were a variation of modified RE springs CJ rear 4.5 springs in the front, YJ 4.5 springs in the rear. front end moved 2" forward on the cj frame
a built Rambler AMC 401 w/ TBI, T18 D300 JB conversion charity package, 4.56's & ARB's (for 35's i should have run 4.10s or 4.27s for highway cruising) and Waggy 44 front. with Scout 44 rear wish i was 1"-1.5 wider on each side in the rear but that's minor. Alloy USA shafts in the rear and warn front shafts with CTM’s. running 35" creepy crawlers and allied steel beadlocks sometimes wish i was running 36's but hind sight is always 20/20. 1" body lift and 4" long 2.5" wide shackles. u bolt flip in the rear. parts mike high steer arms and 1 ton steering components in the front. redrilled and rewelded steering box bracket forward 1.5". most these pictures are before the new engine and before i did the hood louvers and Creepy Crawlers, can’t say enough about how much i like these tires just wish they were a true 35” tire when inflated thats my only gripe but i cant say enough good things about not having to fix a sidewall flat every other trip like i did on my bfgs.
mild motor build from last winter
Rambler motor put the old Javelin 401 back in there again.
bored it over with .030 over forged pistons and 9:1 CR
performer intake
little bit of port matching intake and exhaust with a little bit of hogging to the exhaust ports
Lunati cam# 64501
Adv dur 256/262 Dur @ .050 213/220 lift .484/.507 112/108
7.5 qt reinforced oil pan wow this pan took a beating
dual 2.5” pipes
Holley 670 Throttle body with 85# lbs/hr injectors and GM 7747 computer using craig moates burner 2 etc to program
Heres the real quick build up history thread.
Years ago 33's with some conglomeration of stock and modified springs put together to net 3" rear springs in the front and rear. tired old 360 t18 D300 amc model 20 and D30
![Image]()
![Image]()
couple years later with new steel wheels and a little welder time out boarded front springs, using rear spring packs for some more length and moved the axle and steering box forward a fair amount. D44's at this stage in life found some deals on warn shafts and ctm ujoints used but never run on Pbb and couldnt pass it up. ARB's f&R


terra blow gears post self destruct vs what i run now
low max gear set (that has taken 10 tiems the abuse and never an issue)
Dont buy Terra gear sets they do this even when you dont hammer on em.
Picture deleted
stacking rocks in Moab, sure enjoyed pritchet canyon
Picture deleted
Going up WH1. same trip that i towed a toyota pickup

SUA involves another concept........hang time when driving

getting over it.................nothing like 100-150 RPM climbing a rock ledge and only having to hold the brake pedal. I love deactivating the stall saver programs.

The new hood louvers. a little air flow and some bling for the jeep note the different windshield and hood ........hmm stupidity once and rocks the second time
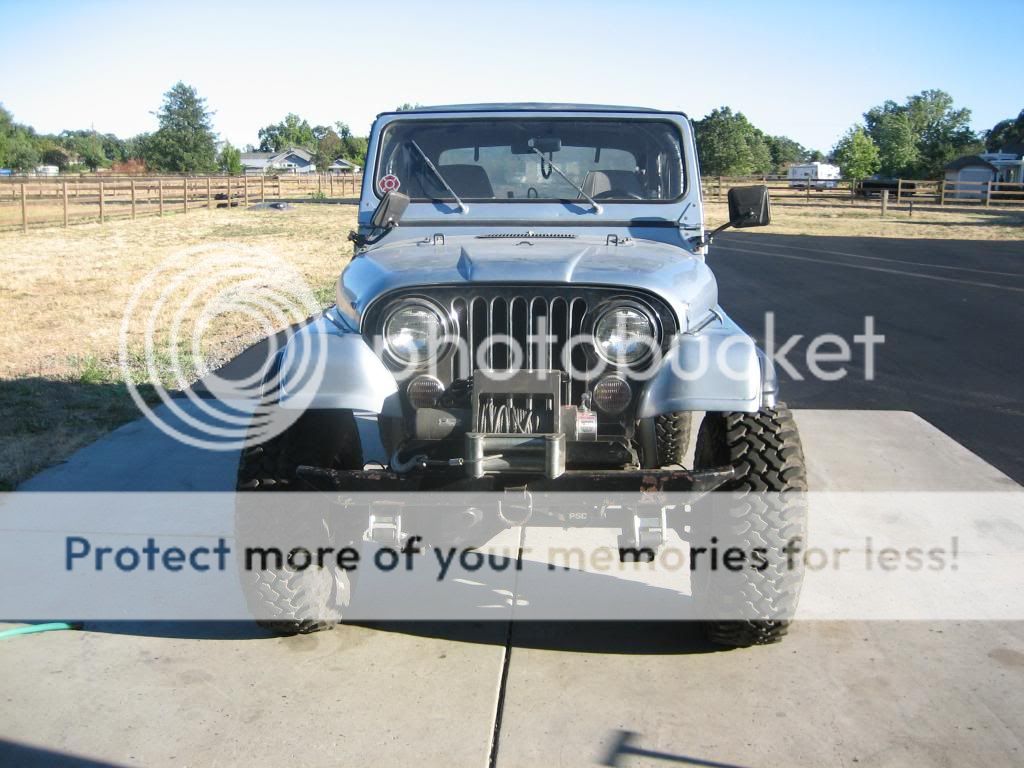
the winch: older pictures i had a XD9000i but some dude with a suzuki bought this 8274 and then discovered it was too big for his application traded the old abused winch and $400 and here is the current recovery option, still had shrink wrap on it
Picture deleted
Flat belly pan. D300 has a D20 oil pan on it for little extra capacity since its clocked up and a home fabed a girdle to try and minimize case flex the t18 was still a hair low even with some grinding it turned out to need 1/4" more room. id say afer this last pull out of fordyce this girdle worked and the gears took every thing i could throw at them this jeep saw every aspect of this motor in a situation i never thought it could handle as a D300. That 401 put down every pony it had pulling a dead fj40 on 38's up the grade without help and did it to meadow without any issues
Picture deleted
Since this took so many turns Updated list of mods:
Some mods
-CJ body onto a YJ frame
-AMC V8 bomb proof bolt in motor mounts in YJ frame
-Recessed 8274 and integrated front bumper build
-Beefed up 8274 AK8.7 style
-custom steering box bracket and moved steering box forward for steering and to have steering hoses clear big radiator and for stretch, Used a Wagoneer pitman arm
-flat belly pan
-seperate tranny crossmember
-floor pan mods and new tunnel
-replaced rear crossmember and installed custom 29 gallon fuel tank that clears stretch hangs down no more than a stock tank and is high and tight to the body
1" BL
-Hydroboost brakes
-Metal Claok front fenders (yeah i cheated and bought em)
Drivetrain:
-Cam'd AMC401 w/ TBI (existing)
-Early GM NV4500 6.32:1
-4.3:1 Atlas
Suspension:
REAR: xj rear springs SUA used for stretch with hangers partially frenched into the frame
FRONT: Wagoneer front 44044 springs or RE1455's for stretch SUA (also ended up running RE1455's for .25" less stretch if you redrill 2nd leaf and flip around but better flex and softer ride, slightly longer than the 44044's ran both and they work well)
Axles:
REAR: Currie Iron Rock Jock dana 60 HP 4.88's using an RD166 ARB with super dana 60 10" R&P, semi floater 5 on 5.5
FRONT: Low pinion 608.9, basically a 44/60 combo using a RD147 ARB and JK rear D44 8.9" ring and pinion with 60KP C's, machined KP knuckles and 35 spline shafts 5 on 5.5
some how slipped another project in an Old school hunting jeep project
- stated with a cheap wrecked CJ7 tub and frame
- stretched steering crossmember to allow steeing box to be moved forward
- garage narrowed a 1979 waggy dana 44 4"
- installed a Power Lok limited slips F&R
- 1 ton steering, HD steering bracket and brace
- JK 8.9" 4.10 R&P in rear scout housing
- AMC 360 2bbl motorcraft, T18 / D300.
- hydroboost brakes
- 2.5" wide springs all around u bolt flips
- 2.5" lift with 31's
I tried to link various threads with relavent info with bold underlined yellow text throughout the text of this build thread
-----------------------------------------
Original top post:
Never thought much of documenting the progress of this jeep its just a jeep but i guess now i should throw up the history before i post up the mods i am planning and hoping to add into this. actual recent photos to follow when i get around to it in a month.
So heres the deal I tried for years to keep the classic CJ look but painting and tapping out my front fenders every year is getting old between trip 2 and trip 8 every year something smacks a rock and its usually influenced by a little attempt at a line i know better than to try. So its time for a tear down and a few upgrades.
Shes not going much taller but the ultimate objective is SUA 2" + wheel base stretch in the rear, a wrangler frame swap since mine looks like a pretzel after towing a FJ from WH3 on fordyce to the top this last trip and never seeing the front tires hit the ground. I want to attempt to fit 37's down the road and not look like a buffoon on the trail with a hacked up pieced together POS with out spending a fortune. So you can bet some tube fenders probably with a 3" flare will be on the front. And finally i want to continue trying to continue to piss off all the nay sayers about being able to keep up on the trail since i am still SUA. lots of effort and little upgrades... incognito approach. i probably could link it and do coil overs for the amount of thought and work going into it. Heres some history on what she was. And now you know what i THINK my plan is, going with longer springs front and even longer yet in the rear with no lost approach and departure angles from what i had, step up tire size, step up diff strength, t-case stength and work out some bugs with cooling..... i hope to yield good results accepting that its still sua and will have limitations.
So what worked for the last 9+ years were a variation of modified RE springs CJ rear 4.5 springs in the front, YJ 4.5 springs in the rear. front end moved 2" forward on the cj frame
a built Rambler AMC 401 w/ TBI, T18 D300 JB conversion charity package, 4.56's & ARB's (for 35's i should have run 4.10s or 4.27s for highway cruising) and Waggy 44 front. with Scout 44 rear wish i was 1"-1.5 wider on each side in the rear but that's minor. Alloy USA shafts in the rear and warn front shafts with CTM’s. running 35" creepy crawlers and allied steel beadlocks sometimes wish i was running 36's but hind sight is always 20/20. 1" body lift and 4" long 2.5" wide shackles. u bolt flip in the rear. parts mike high steer arms and 1 ton steering components in the front. redrilled and rewelded steering box bracket forward 1.5". most these pictures are before the new engine and before i did the hood louvers and Creepy Crawlers, can’t say enough about how much i like these tires just wish they were a true 35” tire when inflated thats my only gripe but i cant say enough good things about not having to fix a sidewall flat every other trip like i did on my bfgs.
mild motor build from last winter
Rambler motor put the old Javelin 401 back in there again.
bored it over with .030 over forged pistons and 9:1 CR
performer intake
little bit of port matching intake and exhaust with a little bit of hogging to the exhaust ports
Lunati cam# 64501
Adv dur 256/262 Dur @ .050 213/220 lift .484/.507 112/108
7.5 qt reinforced oil pan wow this pan took a beating
dual 2.5” pipes
Holley 670 Throttle body with 85# lbs/hr injectors and GM 7747 computer using craig moates burner 2 etc to program
Heres the real quick build up history thread.
Years ago 33's with some conglomeration of stock and modified springs put together to net 3" rear springs in the front and rear. tired old 360 t18 D300 amc model 20 and D30


couple years later with new steel wheels and a little welder time out boarded front springs, using rear spring packs for some more length and moved the axle and steering box forward a fair amount. D44's at this stage in life found some deals on warn shafts and ctm ujoints used but never run on Pbb and couldnt pass it up. ARB's f&R


terra blow gears post self destruct vs what i run now
low max gear set (that has taken 10 tiems the abuse and never an issue)
Dont buy Terra gear sets they do this even when you dont hammer on em.
Picture deleted
stacking rocks in Moab, sure enjoyed pritchet canyon
Picture deleted
Going up WH1. same trip that i towed a toyota pickup

SUA involves another concept........hang time when driving

getting over it.................nothing like 100-150 RPM climbing a rock ledge and only having to hold the brake pedal. I love deactivating the stall saver programs.

The new hood louvers. a little air flow and some bling for the jeep note the different windshield and hood ........hmm stupidity once and rocks the second time
the winch: older pictures i had a XD9000i but some dude with a suzuki bought this 8274 and then discovered it was too big for his application traded the old abused winch and $400 and here is the current recovery option, still had shrink wrap on it
Picture deleted
Flat belly pan. D300 has a D20 oil pan on it for little extra capacity since its clocked up and a home fabed a girdle to try and minimize case flex the t18 was still a hair low even with some grinding it turned out to need 1/4" more room. id say afer this last pull out of fordyce this girdle worked and the gears took every thing i could throw at them this jeep saw every aspect of this motor in a situation i never thought it could handle as a D300. That 401 put down every pony it had pulling a dead fj40 on 38's up the grade without help and did it to meadow without any issues
Picture deleted


") what'd you expect a tube buggy on coil overs
what'd you expect a tube buggy on coil overs 


