Pirate 4x4 banner

Project Slinky Blue Ballz

589K views 1.3K replies 244 participants last post by  troydigby  
#1 · (Edited)
Finally got everything just about tied up on the jeep for a while. It has been a work of progress over the last 3 or so years. Here are the current general build specs:

-stretch wheelbase 7" rear 2" front (102" overall)
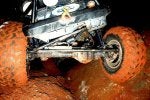
-4 link rear, 4 link and panhard front
-'81 waggy 44 front 4340's, ctms, full spool, Ford 5 on 5.5 outers, 5.38s, and warn hubs
-TJ 44 rear, BTF truss, Detroit, 5.38s, alloy USA shafts 5 on 5.5
-37" iroks on 17" walker evans beadlocks
-Fox 14" Coilovers front and stock ZJ rear coils rear
-BTF fuel cell
 

Attachments

#958 ·
sounds awesome! i've been debating on what exhaust to get for my delnali, this sounds really good.

as a side note, i remember you were using a flux cored welder for everything at 1 point. what welder did you use? we lost our welder we always used (buddy gave us his spare, but needed cash, so sold it, bastard). i'm currently in the market for one and know nothing about them, except how to make shit stick together.
 
#960 ·
I bought a handler 125 back in august '05. It truly has been through hell and back. it was in the passenger seat of my jeep one afternoon soon after I got it and the lead fell out, went under the tire and the whole thing went flying out and I ran it over. Needless to say it still works good to this day.

I was using a lincoln 175 mig when I was in SC but now all I have is the trusty old hobart. My dad is building a garage over at the office, so I will probably acquire some new 220v tools once it is finished.
 
#961 ·
I added wires to the engine harness for the rock lights (since that will be the closest harness to where they are) and the taurus fan. Everything looks a lot cleaner with the wire loom in place.

Also built the battery tray tonight. I used the side posts for the ground and starter. The alternator and all the other positive hook-ups will be in a clamp-style top post.
 

Attachments

#964 ·
Im not too sure it "fit the way I wanted it", but Im just damn glad it all fit!


Just a quick question-


How the hell do you change your air filter?
O yea, I did that today too. I had to cut into the cowl and part of the firewall. Im going to plate it back later.

Anway, it comes off the same way I put it on, pull the cowl off and toss it in place!
 
#966 · (Edited)
the throttle cable is a universal 24" from advance auto

I ran the booster vacuum to the fitting on the side behind the throttle body. you can see it in the second pic.

I ran the passenger valve cover vent between the top plate and intake, then around to the top fitting behind the TB (this is the hole that used to have the EVAP purge valve, but I removed that and put a barb fitting in place)

The driver side valve cover vent goes around to the top passenger side of manifold.

I routed them this way so the oil has to "climb" vertical to get to the intake if I am on my side
 
#968 ·
the express van motors came with manual throttle bodies through 2006, so it is the stock bracket off the motor

Here is what I am doing for my fan wiring:

Ill have a 4 circuit fuse block. 3 circuits will be always hot. One is a 50 amp fuse, and the other 2 are 5 amp fuses.

The other side of the 50 amp fuse will feed a 50 amp relay.
The ground on that relay will be from the PCM pinout that provides a ground when the temp hits 180*
I will have a normal on/off switch (fed by one of the 5 amp fuses off the fuse block) to turn this relay on or off.

When the switch is on, and when the pcm provides the ground, power will feed through relay pin 87 to the FAN HIGH wire

When the switch is off, power will feed through pin 87a (middle pin) into a single circuit on the fuse block, then a 40 amp fuse, then it will go on to power a 40 amp relay. The other 5 amp fuse will always provide 12 volts to the trigger on this relay. When the PCM provides a ground to this relay, power will feed through pin 87 and on to the FAN LOW wire

So basically the PCM will tell the fan when to turn on and off, but I will be able to select if I want it on high or low speed with one switch.
 
#976 ·
Nope. I got back today from being out of town for 10 days, so no progress. I started chopping the brackets/truss off the front 60 today

I looked but must not have looked close enough... Why didn't you flip the intake manifold around to have the throttle body in the front?
I flipped it to be in the rear so it wouldnt hit the hood

He would of had major clearance problems with the hood.
yep
 
#979 · (Edited)
I got the engine cage built. I had to trim the bottom off the rear portion, so Im going to plate that back but not until later as I am scrambling to finish before the end of the month harlan trip. Also built the lower rad. hose. Today Im going to do the upper hose, then finish cleaning the axle brackets off and start mockup for new brackets. Other than seat mounts and all the front suspension and driveshafts, everything is at least wheelable

edit: forgot to mention the engine cage will also have an aluminum top plate
 

Attachments

#984 ·
at this point im barely going to make harlan, so no. The engine cage is welded to the co hoop cross bar, so the whole assembly unbolts from the co hoops on the tube flanges.
 
#987 · (Edited)
couple updates. got the lower frame link brackets built tonight. The axle is sitting exactly where it will be at full bump. Im going to have to chop a section out of the front frame rails to clear the ram and tie rods since it will be behind the axle. I didnt measure, but I think the new wheelbase will be around 111-113 inches. I made templates for the axle lower brackets but its getting to late to cut them out.

The total lateral separation between all the links will be around 30 inches. That should be plenty to keep the axle from moving side to side without a trac bar. Since the upper and lower links will be triangulated almost the same amount, the roll over/understeer should be at or close to 0. I have to have all this crap done and on the trailer 2 weeks from tomorrow afternoon. not good. :(
 

Attachments