Pirate 4x4 banner

Project Ultimate Adventure CJ 6

2 reading
46K views 82 replies 27 participants last post by  jeepjunky  
#1 ·
Hey guys,
I've been working towards this project for a while, and finally got started a few weeks back. it was a case of completly rebuild my old rig, and I do mean completly, or start over... My last rig was Built from the ground up, including the frame, and I had a great time wheeling it for about 10 years, so I have nothing to complain about..... it was a lot of fun, and I have no regrets. I built it in the early days of buggies, and missed my target a little, I wanted to be able to drive on the street, oops! It was well equipped with a 203-205 and 35 spline 60 and 14 bolt with detroits and 44's Swampers
oh well I had a lot of fun, and now I'm moving on to my Ultimate Adventure CJ6, this will be a cross between a Rock Crawler and Expiditionary so I can actually drive on the road, and still wheel the Hammers.

The body I have chosen is a 1973 CJ6. and while I have never been a Jeep guy per say, I have always loved the the rare CJ6 because of the wheelbase of 101" or 103"... my first 4x was an '85 toy with Marlin Crawler #9 and ARBs, my second the S10, both of those vehicles when modified look totally modified and can attract the wrong kind of attention (with red and blue lights). Jeeps have been modified for so long they get overlooked, and never had doors, so you can get away without running doors leagally, kinda like a Harley ( they just seem to get left alone). So in the end I hope to be left alone while driving on the road.... wish me luck.

I have decided to go with an Old School/ New School theme, using the classic old school Jeep look on the outside, even utilizing White Spoke wheels with inner airlock beadlocks. I chose 37" Creepy Crawler Stickies for tires, but already am concerned there not big enough already.

For the modern my "Power Train" I have selected an L92 ( all aluminum) out off a 2008 Denali with about 15,000 miles along with the 6L80 transmission and a Atals 3.8. with parking brake.

Axles, I have 89 Ford Dana 60 HP and 60 rear (I'm rethinking the rear getting pushed toward a 14 bolt) before I'm finnished the front 60 will have 35 spline shafts and as far as lockers I hope to do ARB's. Artech High Steer Arms and Reid Racing knuckles are waiting for me to pick up.(I have the dana 60 axles complete but have not got the upgraded shafts or Lockers/ gears)

Frame, a stock Cj Frame just won't due, so I ordered up frame rails from Throttledown Customs with a little extra lenght so I could adjust the wheelbase as I saw fit, and adjust the width to accomodate the Power train. I'm targeting 110" wb.

Suspension, well thats going to be a 4 link in the rear using Barnes4WD 4 link kit and Johnny Joints.and using 14"Coil overs from FOA

a few other things I Plan on using are PRP seats

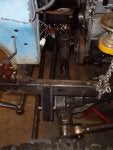
I've also attached pictures the first CJ6 I picked up which will be used for the body, and pics of the mock up that I was usung to get an Idea where everything would mount.

the Pictures of the Mock up are from the beginning of August, and it sat like that for about 5 weeks. till I got started.

the Picture of my buddy and I was taken when we rescued the '69 CJ6 body. That was August '10 that was a great trip in itself just gathering bits...
 

Attachments

#3 ·
Looking forward to this one....here's mine
 

Attachments

#5 ·
My56CJ6 thats a great CJ6, and year one even cooler!!!! I looked at a year one, and passed, there wasn't enough left.... and no vin plate, which made importing to Canada difficult.

Here is my stocker, its a 1970, and 95% restored finished in june '10 with full frame off and sand blasting... needs a couple Seals on the trany, and a new carb which I have.....
 

Attachments

#6 ·
getting ready for a build is like the best , Kinda Like Chrismas with out the sweaters socks and underware.....

here are some of the key componants that I accumulated before the build....
 

Attachments

#7 ·
Now lets get busy.....

Frame Rails from Throttledown Customs Mandrel Bent 2x4x.188 wall Bent to CJ 6 Specs with a little extra length front and rear....

Then make a Box, everything just tacked incase it has to move...

Drill some holes for engine mounts incase they have to move, I did a lot of planning and measuring.... and used a cheapo hand held drill press to try and drill square through both sides of the frame rail ( dont laugh, it worked!). I used AA LS engine mounts.

Bolt in engine mounts

Place Engine and Build temp trasmision cross member outa scrap...
 

Attachments

#9 ·
a few mor pics...cleanning up my rear D60 and getting ready for 4Link Brakets......

Figuring out what I had for space and clearance.....

Positioning the Barnes 4WD barackets and truss.....

Moking up the Links Using 1 1/2"ABS Pipe....
 

Attachments

#13 · (Edited)
OK Rear Links..... completed Im pleased with the geometry, and the lack of 'binding. upon flexing the frame never moved until the link actually contacted it, but no worries bump stops have to go in anyways.

I mocked it up with some little BFG MT that should have been gone long ago, so Now to make sure things are good, I better get the proper tires Mounted ...
 

Attachments

#14 ·
Mounting the wheels,

I ended up with Maxxis Creepy Crawlers 37/12.5R16 stickies ( Im thinking there a little small) and I'm using classicn White Spoke rims, and to keep the look of the un assuming jeep, I went with Inner Airlock Bead Locks.

I relocated the valve stems behind the wheel centers, for protection since I'm not using rock rings.

Lots of talc to get the bead locks casings inside and keep them from twisting...

then the Inner tube that inflates in the casing holding the bead on the rim..

Then I used a piece of wire that I crimped both end together and coverd with heat shrink tube, the wire went around the casing and the tube, and passed right beside the valve stem, this allowed the air in the tire to reach the valve stem so you can check tire pressure without lowering the pressure in the bead lock. if you dont do this, with the beadlock inflated, you cannot adjust the tire pressure or check it... I have more detailed explanation if anyones intrested...
 

Attachments

#15 · (Edited)
Now I'm caught up to this weekend, and with a little help from a friend (thanks Chris!) who picked up a couple packages and forwarded them to me so I had them for the weekend, I was able to get most of the front suspension done (mocked).

I think I'm close with the geometry on the 3 link/Steering. Now it can fester a little untill I'm convinced.

I struggled with placement of the Tie rod/Drag link/Panhard Rod. I am using a Scout Box, and started out with RND Customs High Steer (OTT Arms there availible if anyones intrested) but they were too High for the geometry of my frame/setup. I had no up travel.

So now I changed, and bought Reid Knuckles and Artec Arms (5 studs) which moved the tie rod farther forward, and allowed me to put the tie rod at the hight that best suits what I'm doing. It also gave me more room for the panhard rod (which if I do a bent one should get me to a better angle), although I still might need a bent pan hard Rod, and the Drag Link is at a good angle. I will also likely need to notch the frame at the front to get the 6" of up travel I want.

To get the drivers side link bracket to attach too the Steel Tube, and not the Casting I trimmed bact the Spring perch buy about 1" all the way around the casting. this allowed the Bracket to be attached to the Steel tube instead of a casting.
 
#21 ·
Hey guys been nuts this past few weeks. I needed to give up a weekend for her birthday and build a rock garden with her My Idea of a rock garden is not the same as hers...), thats not a complaint either, she's awsome, and knows I'll work on house projects as hard as the Toys... just have to keep it balanced. there has been a lot of Shop projects this year with the 1970 CJ6 Resto as well.... not to mention a lot of travelling (driving) some 4000 miles for work this past month alone. With winterknocking on the door ......'The "Barn" (converted top shop) has been in need of a new roof for a while, and that was the focus of last weekend and I still need 1/2 a day to clean up (if i put that off it will get covered with snow, and I wont see it for a few months.... But the roof is done, and now as time permits I can insulate the ceiling and keep it a lot warmer for winter...... Also just got back from Sema last night, and that was mind blowing!!!! and on her list is a Bathroom Reno I promised for her bithday....... that said, Ill get out there at some point, I just picked up a bunch more Brackets, to rework the Front, and I have some Ideas there.... that will address my issues...

While at Sema, had a chance tio look at some Items I need to get ordered like Coils, Bump Stops, Fue system componants and Rads/Fans.....
 

Attachments

#22 ·
LMAO, I actualy bought one yeas ago from a local place up here in Canada (Canadian Tire) sort of an Auto parts tool place, and got rid of it probably 15 years ago.... this one showed up about a week before this pic from a Cleanup in her dads garage, and I din't know it was comming, but I knew some stuff was waiting for me when I came back from a bussiness trip. about a week later, I was longing for mag base drill, and saw this..... strapped in the hand drill and a couple of clamps... it allowed me to drill holes squarly through my frame, without killing the drills.......
I would look someplace like Harbour Freight... its designed as a Portable Drill Stand....for a 3/8" handheld drill.
Found this link, but says unavailible, but it gives you something to go by... sorry i couldn't be of more help...
 
#20 ·
I'm liking the build, very clean.

One thought on the links in the rear. Have you considered moving the lower links to the outside of the frame rail? This would eliminate the contact from the articulation of the axle and should give you some more ground clearance to boot. I'm not sure what the situation is up front but it may do the same for you up there too.
 
#24 ·
Um er CUZ.... thats the simpilest answer.... but not really sure, I was working with the 4 link Calculator, and came up with some pretty good numbers. Initially ( when I read your Post) I was thinking that it changed the the geometry significantly, and I precieved there wasn't a clearance issure due to the fact I'm building a more Trail Oriented CJ6 and not the Ultimare rock crawler ( Although I'm pretty sure it wont Suck!.... I Also thought the brakets were more protected on the inside....

I went back and looked at the 4 link, and it changes my anti squat from 80 to 79 and my understeer from 0 to 1%. with my roll center at 27" so its still solid.

This is why my brackets are only tacked in place and not fully welded, so I will have to consider moving them. an extra set of eys is helpfull....

The front brackets, are comming off either way and I wanted to make sure I could clear larger tires ( upto 42") at full turnwithout rubbing, once I get the panhard drag link and steering box changes I need to do, I will also redo the upper link so its the same length as the lower.... then I'll cycle the steering and see if i can clear the 42's at full lock, or see if I have other limiting factors... currantly I'm not happy with the front geometry anyhow.... so thats the next thing I intent to address.

thanks for the comment!
 
#23 ·
cool build---just like what I'm doing with my flatty(suspension wise anyway)--do you mind taking some measurements and photo's of the steering box for me--that's the one thing that's killin my set up unless I go full hydro and maybe that steering box will help me out--

what I'd like is what exact steering box you used and the box dimensions--width, height --also from centerline of axle to center line of box --centerline of axle to back of bumper and center line of axle to center line of frame panhard mount--- also from bottom mounting hole to bottom of pitman shaft----

this would be much appreciated and will save me from buying a box and returning it if it won't work---chris
 
#25 · (Edited)
So Imannaged to get out into the shop saturday afternoon and evening and rework the Sterring, I'm almost there........ heres the the description of the pics....

1
steering redo... I pretty much have it close angles are looking good, I decided to lift it another inch, this puts my belly height at 24", and with trimming of the frame, about 4-5"of Up travel, After talking to Fred, I'm convinced I need a Early Bronco Box which mounts forward with Pitman arm pointing back. also, the Drag link will ultimately get Attached to the Tie rod so it can be identical length to the Panhard. the Pan hard will also need to be bent to go over the Diff Cover as this is the biggest limiting factor for up travel on the suspension.

2
this shows everything has some room with the steering box mounted forward the Pan hard has room when the axle stuffs.

3
Looking dow at Drivers side for Clearance

4
show the approximate clearance of the passenger side Pan hard mount
and the coil over ( need to order coil overs)

5
Shows tire clearance at full turn, Drag link needs to move back 1/4"to clear at full turn.
 

Attachments

#26 ·
part 2 for saturday......

1
Front Bumper needs to be short to clear tires at turn specially if I want to clear 40"s

2
shows approx. mounting height of the Coil Spring at Stuff, and how high the tire will need to clear

3
Tire too steering box clearance at full turn

4
Tire to Link arm Clearance at full turn, Looks Like larger tires will rub

5
Flexing Front Axle, the suspension doesn't seem to Flex that well I measured about 18"up and down at the hub, and based on this could probably make due with Shorter coils, like 10"travel instead of 14! Not sure how I feel about this....I would like more travel in my mind.....seems to be binding, but not sure where…..
 

Attachments

#29 · (Edited)
csutton7 please note while that is a Scout box, it is not in the proper position. Scout box Functions with the Pitman arm Forward!
if you like the box mounted forward with the Pitman Arm Facing back like in the picture.... then what you actually Need is a 66-77 Bronco box. I do not have ione yet, but was able to simulate by removing the pitman arm and reversing it for mock up.

cheers!
 
#31 ·
thanks a ton on that bit of info---I have 17.5" from center line of axle to back of bumper so a saginaw box doesn't work--screw up by me and I don't want to add a 2-3" piece of frame just to make it work, so it's either the 66-77 bronco box or full hydro---

wish I could help you on the springs, but since I'm still in the build phase I don't have any real world data---chris